• Skip to primary navigation
  • Skip to main content
  • Skip to primary sidebar
  • Skip to secondary sidebar
  • Home
  • About me

The Constant Scrapper

If I'm not scrapbooking I'm thinking about scrapbooking!

Janice Daquila-Pardo

Oh Christmas card, oh Christmas card!

December 15, 2010 By Janice Daquila-Pardo 1 Comment

I remember reading once that uber-organized crafter, Becky Higgins, designs and creates her Christmas cards in July. Then in December she just adds the family photo and they’re done. Wow. I would love to be able to get my cards ready that far in advance, but honestly I just can’t get into it in July. But every summer since reading that idea I think to myself, “I should design this year’s Christmas card now so I’m ahead of the game.” But who am I kidding?

I’m pretty slow at crafting, so when I announced last weekend that it was time to start my Christmas card-making project, Matt moaned. He’s been through this with me too many times to look forward to it! He suggested, “Can’t you just buy cards to send, like normal people do?” To which I proudly replied, “I’m not normal. I’m a crafter!” And I immediately began tearing my hair out over my design.

The right Christmas card design is not easy to conjure. In my opinion it should include the following characteristics, if at all possible (which is why it’s such a tall order for a scrapper who seldom makes cards, like me):

  1. It should use a good cross section of your many Christmas scrap supplies (so you feel justified in buying them all!).
  2. It should be relatively flat so that it’s easy to mail and doesn’t require extra postage.
  3. It should sparkle like the season.
  4. It should come across as heartfelt and cozy.
  5. It should be complicated enough to impress your receivers without being so complicated that replicating it in numbers is painful.
  6. It should make you feel proud to sign it.

So with my list of prerequisites in mind, here is this year’s effort. I went for a vintage/shabby look, combining the subtle distressing in the design of the patterned paper and the old-fashioned Santa image. The supplies I used include glitter patterned paper from the Oh Christmas Tree collection by My Mind’s Eye, stamps from the Classic Holiday set by Inkadinkado and a Martha Stewart edge punch.
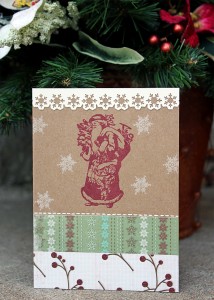
Our 2010 Christmas card

Our 2010 Christmas card

Filed Under: Cards Tagged With: cards, Christmas

Two tips for Silhouette users

December 8, 2010 By Janice Daquila-Pardo Leave a Comment

I don’t tell people what I want for Christmas. It’s just not my thing…well, not since I was little and would spend hours spread out on the living room floor with the JC Penney catalog in front of me, carefully noting the page numbers and details about the items I hoped Santa would bring. It didn’t take me many years to realize, though, that I much prefer to be genuinely surprised when I open my gifts. I love the anticipation. I love to slowly, painstakingly unwrap the item that my loved one brainstormed, purchased or made and wrapped. It all takes thought, and I really appreciate that thought and love the feeling of it.

So, because I don’t create wish lists for my peeps, I don’t believe I can expect them to know the deepest desires of my heart (materially speaking). I mean, how could they? All I expect is that they will give me something that they believe I’ll like based on what they know of me. Is it so far fetched to believe that sometimes our deepest desires might intersect with what our family knows about us? Do you believe? I still believe.

In 2008 Matt was my Scrap Santa! I have one of the original QuicKutz Silhouette machines because my loving husband figured me out. I remember being so surprised when I opened that package that I started to cry. How in the world did he know how much I had been longing for one?

Well, I love my Silhouette…most of the time. But there are definitely ways that my experience in using it could be improved. I mean, how many of you Silhouette users who upgraded to the new Studio software really like the improvements to the interface but find that it crashes about every other time you use it? And every time I buy a new design or two using my subscription I have to go back in and re-download it. Oh well, those are just technical snafus; I still love using the machine and am amazed at what I can make with it.

So, I recently came across a few ideas for making your Silhouette crafting even better, and I think it’s only fair to pass them along to you, gentle reader:

  • Cardstock that is a bit “creamier” in texture is said to cut better. In fact, I’ve heard from several sources that American Crafts cardstock is awesome to cut with the Silhouette.
  • Once you’ve chosen your design and sized it the way you want it, mirror horizontally so that it is in reverse. Then flip your paper over so that it’s face down when you put it on your carrier sheet. This way once you’ve cut the design you can just apply your adhesive to the die cuts while they’re still on the sticky mat. Then just lift once and adhere to your page.

I hope these few tips are useful to your scrapping life. Every little tip helps, right?

Filed Under: Tips Tagged With: Silhouette

Making a Christmas banner: Fa la la la la!

December 6, 2010 By Janice Daquila-Pardo Leave a Comment

I really like to follow scrapbook trends. But I don’t always try each one because either it doesn’t fit my style or I don’t want to buy the needed supplies just to try it. But banners are a craze that I have been able to get into.

There are so many times when a banner is the perfect way to add a celebratory feel to the occasion or scrapbook page. And there are a million ways to make your banner unique.

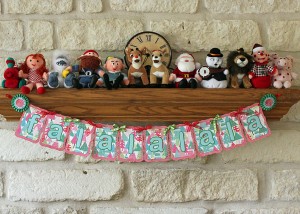
I just completed a Christmas banner this weekend to grace our fireplace mantel. I’m including details about how I made this in case you’d like to make a banner for your house but don’t want to take time figuring out the measurements, etc. First is the finished banner:

Fa la la la la Christmas banner

The finished product: My Christmas banner

And here’s how it came together:

  • Choose two 12×12 sheets of two patterned papers (the Christmas trees are by The Paper Studio, and the distressed polka dots are by My Mind’s Eye).
  • Pull two colors of 8.5×11 cardstock for the letters.
  • Select two coordinating colors of ribbon.
  • Grab your dry adhesive as well as your hot glue gun.
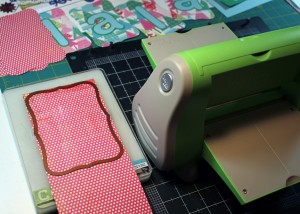
  • Die cut the individual flags of the banner using the two largest dies in the Spellbinders Labels 8 set.
I cut out the flags of the banner using the two largest dies in the Spellbinders Labels 8 set and my Cuttlebug.

I cut out the flags of the banner using the two largest dies in the Spellbinders Labels 8 set and my Cuttlebug.

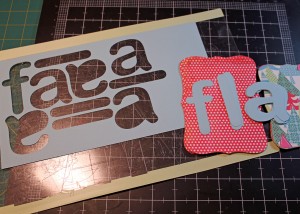
  • Cut out the letters to spell your chosen message. I set up my words in my Silhouette software and cut the pale blue for the letter and the green for the offset. I used the Arial Rounded font.
I cut out the letters for my version using my Silhouette

I cut out the letters for my version using my Silhouette.

  • Assemble the two layers of the lettering.
  • Assemble the two layers of each flag.
  • Center and adhere the appropriate letter to each flag to spell your word.
  • Use a hole punch in both corners of each flag, lining up subsequent flags to the first for consistent placement.
  • Lay out the banner as you want it to hang (in the correct order) on your work table.
  • Plug in your glue gun to start it heating up.
  • Cut ribbon into 12-inch lengths for each hole. I used 11-inch lengths and think it would have been easier to tie into bows with a little more. I also alternated the two colors so that every other tie was the other color. Tie each flag to the next one.
  • String a length of ribbon through the first and last holes to create hangers. Because I had already decided that I would be adding a rosette to the ties (which would cover my adhesive), I used a hot glue gun to attach the two ends of the ribbon to form a loop.
  • Create two rosettes, one for each end’s tie. For each:
    • Cut a 1.25×11-inch piece of cardstock and accordion fold it.
    • Glue one end of one strip to its other end to form a loop.
    • Punch a 1.5-inch circle out of a spare bit of cardstock and place it on your worktable. Put a good dose of hot glue all over the circle and immediately but gently “close” the accordion onto the hot glue. Hold your rosette in place until the glue dries.
    • Die cut or punch coordinating toppers for your rosette and use the hot glue to adhere them.
  • Adhere the rosettes to the ties of the banner. For each, punch another 1.5-inch circle out of cardstock. Slather it with hot glue, then quickly place it behind the spot on the tie where you attached the two ends earlier. Place the finished rosette right above the sticky circle and create a sandwich around the ribbon.
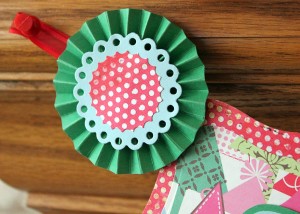
Create a rosette with leftover supplies to finish off the ends of the banner.

Create a rosette with leftover supplies to finish off the ends of the banner.

  • Hang your artwork for all to see!

If you played along and created a banner following these steps (even if loosely) please let me know in the comments. I would love to see what you made. And if my directions leave you with questions, post those in comments as well. I’ll try to clear things up for you.

Filed Under: Tutorials Tagged With: banner, Christmas, rosette, Silhouette, Spellbinders, trend, tutorial

It’s not too late to make a Christmas planner

December 3, 2010 By Janice Daquila-Pardo Leave a Comment

I love Christmas. In fact, my family calls me “the Christmas girl” and “Cindy Lou Who” during this time of year. One of the myriad things I love about the Christmas season is that it gives me an excuse to make gifts for the ones I love.

A few years ago I decided I wanted to make a Christmas planner for my mom as a little Thanksgiving gift. So I searched online for examples and found tons, of course. But then I found one particular resource that’s right on the mark: christmasplanner.com gathers tutorials from all over the web for making Christmas planners of all varieties! Nice.

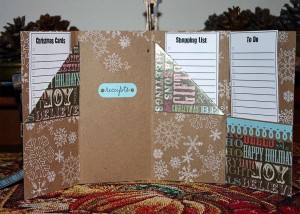
I chose one of the examples, followed the tutorial, and this is what I came up with for Mom:

Christmas planner, inside view

My Christmas planner, inside view

Christmas planner outside view

My Christmas planner, front view

If you’ve been wanting to make a planner but think it will take too much of your precious Christmas crafting time, just take a few minutes to look at this site before you decide. The examples/tutorials range from very simple to really involved. So, you can choose how much time to devote to your project. I chose to follow a tutorial that was on the simple side, and I really enjoyed making it. Plus it gave me a nice opportunity to use some of my Christmasy supplies and then give away the final result! Happy crafting!

Filed Under: Tips Tagged With: Christmas, tutorial

My first guest designer spot!

December 2, 2010 By Janice Daquila-Pardo Leave a Comment

A few posts ago (You cannot win if you do not play) I talked about becoming more involved in the online scrapping community by starting this blog, entering challenges, etc. I had just decided to apply for the first time to be on a design team. Well, now I can give more details because I know more!

The 2011 members of the Scrapbook Generation Publishing Creative Team have been announced! Congratulations to all 13 women who were chosen! These are some amazing designers on this list! I was not named, but I did receive a lovely email from Allison Davis (one of the owners) this morning offering me one of 12 guest designer spots for next year! Oh my! I am so very excited. For one whole month I get to create projects based on their sketches and share them with their readers. Doesn’t that sound fun?

Here is how Allison explained it on their blog:

We also came to the decision that since it was so hard to narrow down that we are going to select 12 guest designers from the entries. We’ll be sending out those emails sometime this week. The guest designers will differ a little from how I’ve been doing them here. At the new site the guest designers will be included for a month and have the opportunity to make several projects instead of just one.

I don’t know yet which month I’ll be guest designing, but of course I’ll post here as soon as I hear more details. Oh happy day!

Filed Under: Uncategorized

« Previous Page
Next Page »

Primary Sidebar

Thanks for visiting!

Hi, I'm Janice.

Follow me

Follow on Bloglovin

My sketches on Pinterest

Design team

I am a proud Stuck?! Sketches designer!

Past design teams

Scrap & Music sketch designer

Creative Scrappers sketch designer

Sketches With a Twist sketch designer

Sketchabilities design team

Twisted Sketches design team

Secondary Sidebar

Topic categories

  • 12×12 layouts using 6×6 paper
  • Cards
  • Freebies/giveaways
  • Layouts based on sketches
  • Layouts using 3×4 journaling cards
  • My scrapbook layouts
  • Reviews
  • Scrapbook products
  • Sketches
    • My sketches
  • That redo that you do
  • Tips
  • Tutorials
  • Uncategorized

Archives

Tags

1 photo 2 photos 3 photos 4 photos American Crafts banner Basic Grey Bella Blvd Blogtoberfest border punches cards Christmas Copic coloring Crate Paper Creative Scrappers Echo Park emotional journaling Fancy Pants Halloween hand stitching Jillibean Soup Little Yellow Bicycle Making Memories Martha Stewart Crafts My Mind's Eye October Afternoon one-page layouts Pebbles Pink Paislee rosette Scrap & Music sketches scrapbook philosophy Silhouette Simple Stories Sketches with a Twist Sketch Support Spellbinders stamping Stuck?! Sketches Tim Holtz Distress Ink tutorial Twisted Sketches two-page layouts vintage photos We R Memory Keepers

Copyright © 2010-2018 The Constant Scrapper