• Skip to primary navigation
  • Skip to main content
  • Skip to primary sidebar
  • Skip to secondary sidebar
  • Home
  • About me

The Constant Scrapper

If I'm not scrapbooking I'm thinking about scrapbooking!

Tutorials

Kiss kiss layout and string art tutorial

June 10, 2015 By Janice Daquila-Pardo 4 Comments

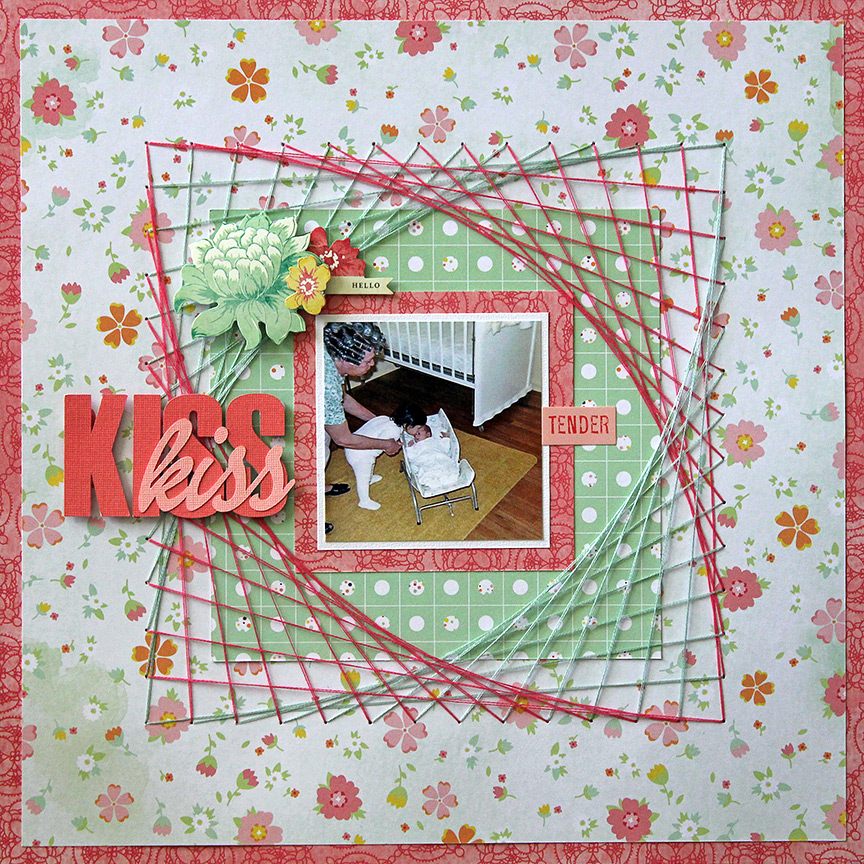
This one-photo scrapbook page incorporates a photo frame created with string art.

I’m so excited about today’s project because 1) I tried something new and 2) liked how it turned out, so 3) I want to share the idea with you! Do you remember doing string art projects as a kid? That’s what I incorporated on my layout as a frame for my small photo of Grandma helping me kiss my brand new brother in January 1968. Mom says I called him “B” (for baby).

My thought process

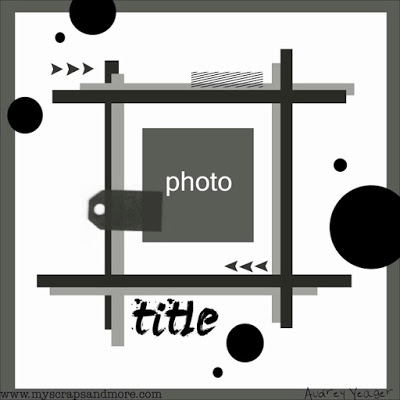
This idea came to me because of a sketch (as most of my scrappy ideas do). I was referencing this My Scraps and More sketch below, and I started thinking about how I wanted to create the central “tic-tac-toe” area of the page. I ticked off my options (get it?): strips of patterned paper, strips of washi tape, strips of ribbon, lines of stitching. Lines of stitching made me picture creating an elaborate hand stitched grid area to frame the photo. And then it hit me: string art!

I went to Pinterest and perused other artists’ string art in search of some ideas for making a square frame (as represented in the sketch). After successfully incorporating this technique into my page design, I thought I should share my process in case you like the look as much as I do.

My Scraps and More sketch 107

String art tutorial

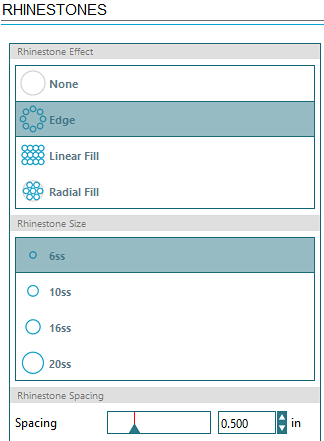
After deciding to make the string art area take up 8×8 inches in the center of the 12×12 page, I created a quick template for myself in my Silhouette Designer software. If you have a Silhouette and want to recreate this, draw an 8×8 square, center it on the page, open the rhinestones window and follow the settings below. If you don’t have a cutting machine, just measure and mark equidistant holes (perhaps 1/2 inch apart) with a ruler.

rhinestones settings I used

I cut out my simple template on a scrap piece of paper, lined it up over my background paper and poked the holes. Then the fun began!

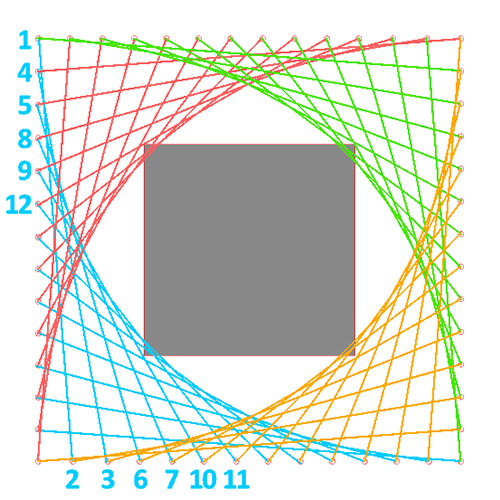
I double matted the 3×3 photo with white cardstock and patterned paper so it would pop better off the background. Then I mounted that onto another pattern that was 6.25 square. Following the numbering system in the diagram below (up at 1, down at 2, up at 3, down at 4, etc.), I stitched away with two colors of embroidery thread to create the four corners of my square frame.

String art stitching diagram

I do hope this tutorial was helpful to you. If you decide to try this technique on a page, I would LOVE to see it, so please come back and leave me a comment on this post. I will leave you kindly comments in return, I promise!
Filed Under: Layouts based on sketches, My scrapbook layouts, Tutorials Tagged With: 1 photo, American Crafts, hand stitching, one-page layouts, Silhouette, tutorial, vintage photos

Tutorial: Make a planner for the new year

January 19, 2015 By Janice Daquila-Pardo Leave a Comment

If the raw potential of a new year makes you feel like planning, then you might want to make this mini album to use as a way of organizing yourself.

All the products I used to create this came from the Back Porch Memories January kit (thank you to BPM for allowing me to be a part of their design team for the next three months!). The patterned papers are from BoBunny’s “Souvenir” collection.

2015Planner03_Daquila-Pardo

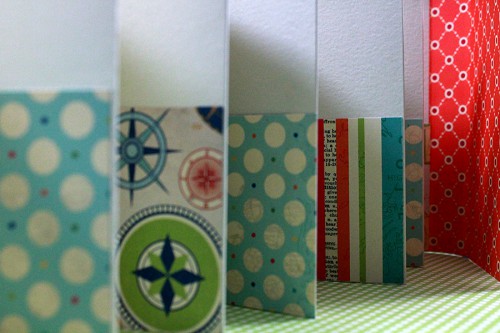
Here’s a view of the inside of the accordion album with pockets on every other page.

You will need:
3 pieces of 12×12 cardstock
1 piece of 12×6 patterned paper
12 4×3 pieces of patterned paper for the pockets

Tutorial

  1. Score the three pieces of cardstock at 4 inches and 8 inches. Then cut each down into two 12×6 pieces. You will have six scored 12×6 pieces.
  2. Accordion fold the scored pieces and glue them together by overlapping the end flap of each. This will create an album with 12 two-page spreads.
  3. Put a thin line of glue around three sides of each 4×3 pocket and adhere them to every other panel, including the back side of the accordion. When you’ve completed this step, on each of the two-page spreads you will have a blank left panel and a pocket on the right panel.
  4. 2015Planner02_Daquila-Pardo

    Put a thin line of glue around the sides and bottom of each pocket.

  5. Make the cover by scoring the 12×6 piece of patterned paper at 3.5 inches, 4.5 inches, 8.5 inches and 9.5 inches. Adhere one end of your accordion to the inside center of the cover.
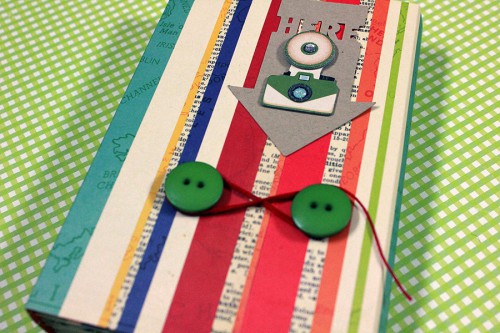
  6. Now decorate your cover and either tie a length of ribbon around the whole thing to close it or attach two buttons and wrap with twine, as I did.
2015Planner01_Daquila-Pardo

My planner’s cover, decorated and secured with a button-and-string closure.

On the left panel of each spread you can make notes or adhere photos or a calendar. And the pocket panel can be used to stash memorabilia, more photos, etc. I think I’m going to use my album to plan layouts and blog posts! I hope your planner assists you in organizing your new year, too.

Filed Under: Tutorials Tagged With: mini album

Wine bottle tag tutorial

December 13, 2014 By Janice Daquila-Pardo Leave a Comment

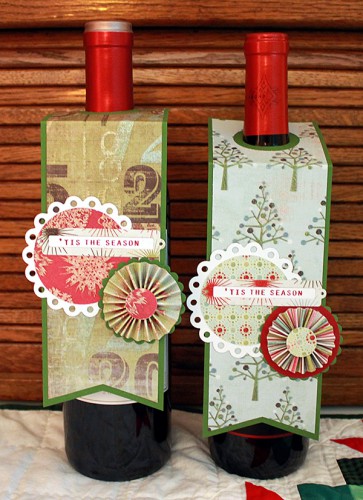
TisTheSeasonWineTags1_Daquila-Pardo

We have some Christmas parties to attend this weekend, so I thought I would try my hand at making some wine tags to adorn the bottles we took along. Here’s a tutorial based on what I learned while creating mine.

Tutorial

  1. Cut base paper (I used cardstock, but it would look quite nice with patterned paper as well) to 3 x 10 inches.
  2. Score base paper at 3 inches.
  3. Cut patterned paper to 2.75 x 9.75 inches.
  4. Don’t score the patterned paper yet; you want to wait until it’s lined up properly on the base paper so you know exactly where it needs to be folded. But I do recommend scoring a second time so that your project folds crisply. I’ll tell you when.
  5. Notch the bottom of the patterned paper into a banner shape.
  6. Lay the patterned paper on the base paper and cut the matching notch into the base paper.
  7. Flip the base paper over and find the center of the 3-inch section by lightly drawing an X from corner to corner. This will ensure that you punch your bottle neck opening in the right spot.
  8. At this point, because I use adhesive that isn’t hard to pull up, I adhered the two papers together so that I could punch them at the same time. Then I used a 1.25-inch circle punch to create the bottle neck opening.
  9. Carefully pull up the patterned paper from the base paper and line up a 1.5-inch circle punch around the original hole to create the double ring effect. Glue the two papers back together.
  10. Now put the project back on your scoring board and score again at 3 inches.
  11. Have fun embellishing your wine tags!
TisTheSeasonWineTags2_Daquila-Pardo

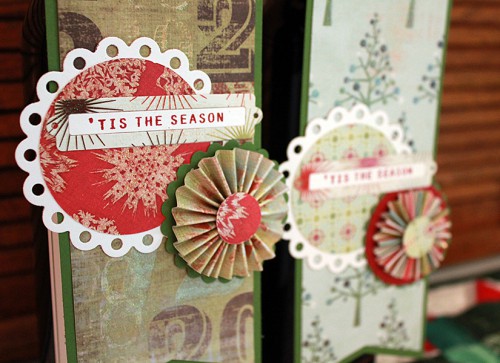
Closeup shot of the left tag

TisTheSeasonWineTags3_Daquila-Pardo

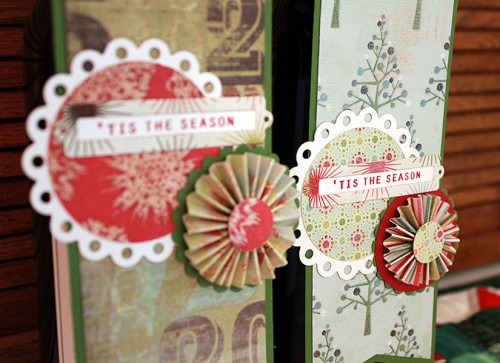
Closeup shot of the right tag

Product/technique notes

I created both of these tags using past years’ My Mind’s Eye Christmas collections—”Festive” on the left tag and “Be Merry” on the right one. I loved how they turned out! And I’m entering them in the MME December challenge to make small gifts/stocking stuffers.

Filed Under: Tutorials Tagged With: Christmas, My Mind's Eye, rosette

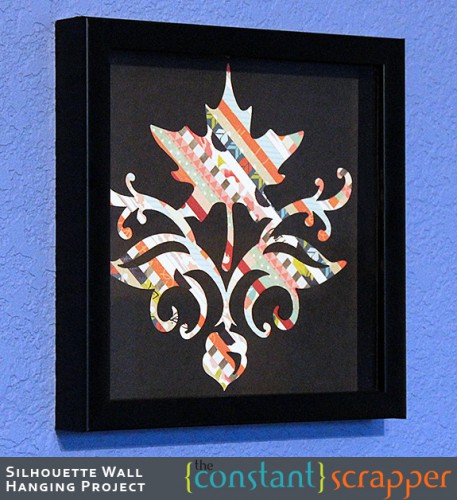
Using patterned paper strips to create a colorful silhouetted wall hanging

November 20, 2014 By Janice Daquila-Pardo Leave a Comment

SilhouetteWallHanging_TheConstantScrapper

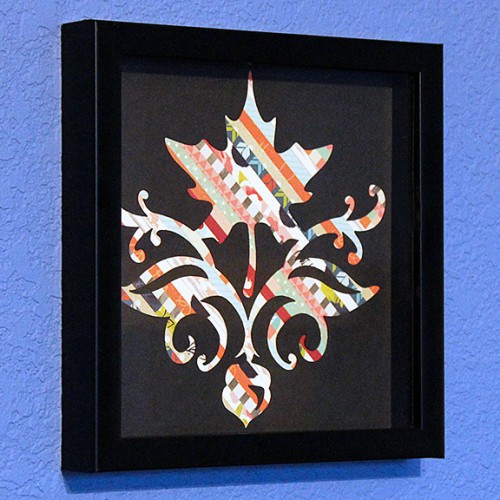
Once I had completed layouts with all the patterned paper in this month’s Back Porch Memories kit, I used the scraps to create something pretty for our home. Here’s how I turned my offcuts into a colorful seasonal wall hanging.

The tutorial

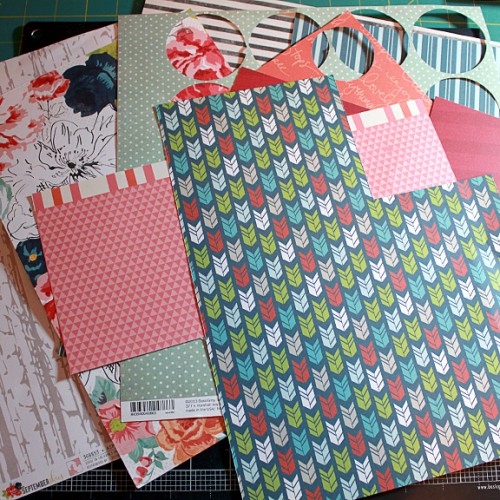
Daquila-PardoTutorial1

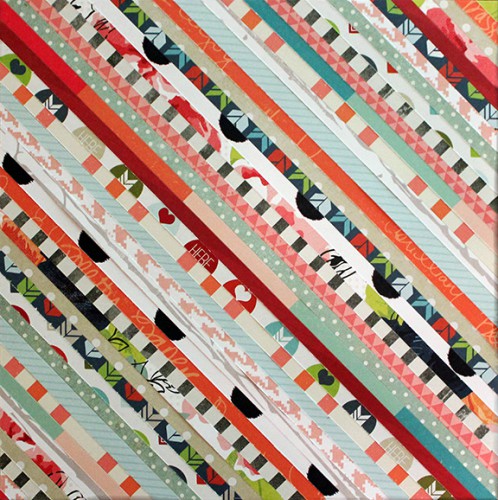
My final project will be 8×8 inches, so I started by cutting down a sheet of cardstock to that size. This will be the base for my design. Then gather all the patterned paper remnants together.

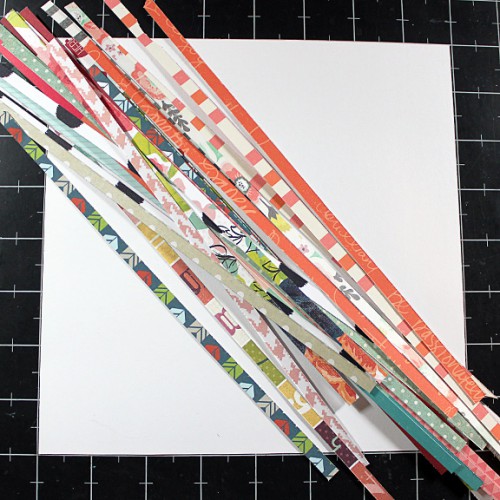
Daquila-PardoTutorial2

Cut 3-4 ¼-inch strips from each.

Daquila-PardoTutorial3

Apply your adhesive of choice (I used a tape runner) liberally to the base. Begin laying down strips on the diagonal, butting each snugly against the last so there’s no cardstock showing through.

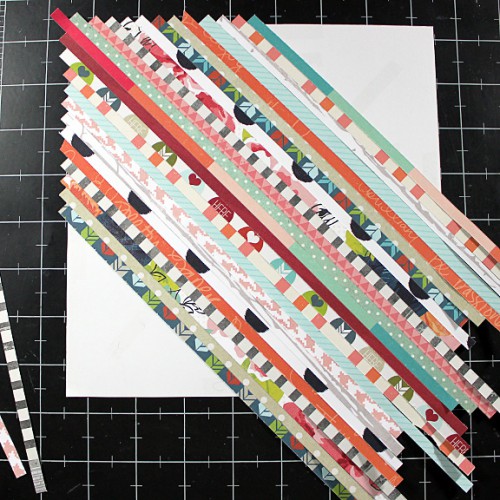
Daquila-PardoTutorial4

Fill the whole base with strips. Cut off the excess.

Daquila-PardoTutorial5

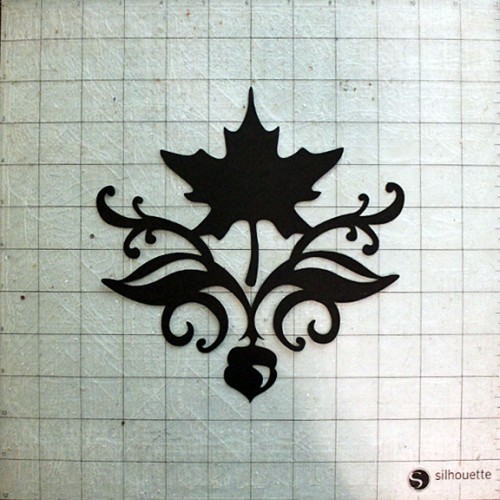
Cut out your chosen overlay design from black cardstock, either with a digital die cutter or by hand. For my project I chose a fall-themed design from the Silhouette store, sized it to 7.25 inches and centered it within an 8-inch square before cutting. I suggest the design you choose should both work well as a silhouette and fill a good bit of your square. That way lots of the patterned paper can show through.

Daquila-PardoTutorial6

Adhere the silhouette to the patterned paper (I used repositionable adhesive so I can change out the design later). If there are any inner pieces to the design, as there were in mine (under the maple leaf, down the centers of the side leaves and on the acorn), adhere those as well so that the design “makes sense” to the eye.

What I think is so great about this project is that it allows you to use scraps of paper that you love in a completely new way, but it doesn’t use very much of it so you still have lots left for making cards, mini albums or cards for your pocket scrapbooks—however you usually put your scraps to work.

I can also see myself using this as a go-to seasonal home decoration. I can either cut out a different silhouette design and lay it over these same strips or use scraps from another kit to create a new background as well!

Filed Under: Tutorials Tagged With: Guest design, Silhouette

Silhouette tutorial: How to add crochet to the edge of page elements

October 19, 2014 By Janice Daquila-Pardo Leave a Comment

Our17th_Daquila-Pardo

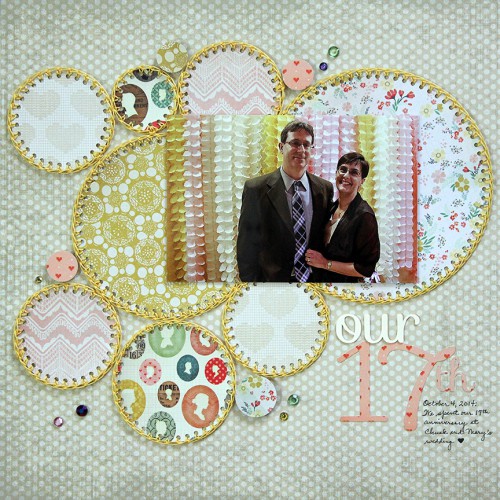
To add the lovely crocheted detail around the circles on this page about our 17th anniversary, I turned to my Sihouette Cameo.

I wanted to create a really special look for this photo of us on our 17th anniversary, so I decided to crochet around the edges of all the circles. Crazy, I know! But it’s really not that hard, and I just love the soft, feminine look. I thought a tutorial would be helpful to any of you who want to try this on your own layout.

The tutorial

For me, it almost always starts with a sketch. In this case I chose to use this circle-filled Paper Camellia sketch. If you want to base the shapes you will crochet upon a sketch then you need to start by placing the sketch image in the Silhouette design software:

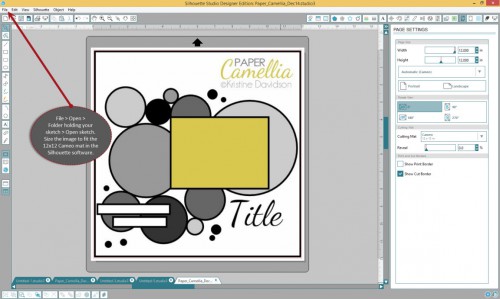
Step 1: Open sketch in software

Step 1: Go to File :: Open :: Folder holding your sketch :: Open sketch. Size the image to fit the 12×12 Cameo mat in the Silhouette software.

Start drawing the shape(s) to be crocheted:

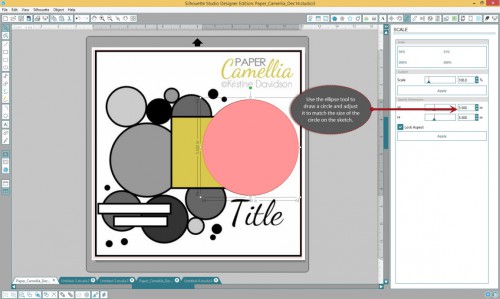
Step 2: Draw the shape

Step 2: Use the ellipse tool to draw a circle and adjust it to match the size of the circle on the sketch.

Copy/paste the first shape and reduce it:

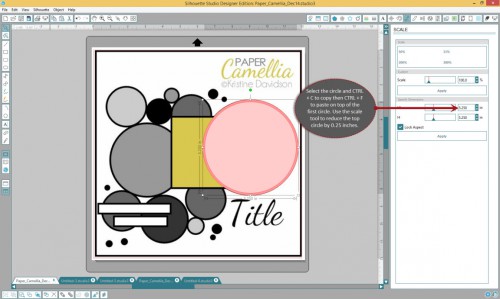
Step 3: Make a second smaller shape

Step 3: Select the circle and CTRL + C to copy then CTRL + F to paste on top of the first circle. Use the scale tool to reduce the top circle by 0.25 inches.

Turn to the rhinestone tool to create holes around the edge of the shape:

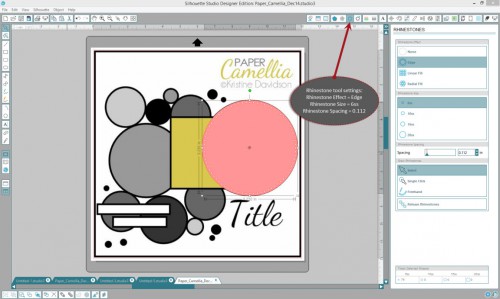
Step 4: Use the rhinestone tool

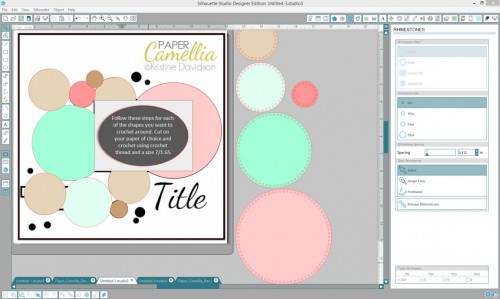
Step 4: Step 4: Rhinestone tool settings: Rhinestone Effect = Edge; Rhinestone Size = 6ss; Rhinestone Spacing = 0.112

Cut out the shape(s) and crochet!

Step 5: Cut and crochet

Step 5: Follow these steps for each of the shapes you want to crochet around. Cut on your paper of choice and crochet using crochet thread and a size 7/1.65 mm hook.

Product/technique notes

The patterned paper I used is from Crate Paper’s “Close Knit” 6×6 paper pad. I also used my Silhouette to design and cut my title.

I really hope you will try this technique on a page of your own (and that it’s fun for you)! If you do, will you leave a comment with a link to your page because I would LOVE to see it.

Filed Under: My scrapbook layouts, Sketches, Tutorials Tagged With: 1 photo, Blogtoberfest, one-page layouts, Silhouette

Next Page »

Primary Sidebar

Thanks for visiting!

Hi, I'm Janice.

Follow me

Follow on Bloglovin

My sketches on Pinterest

Design team

I am a proud Stuck?! Sketches designer!

Past design teams

Scrap & Music sketch designer

Creative Scrappers sketch designer

Sketches With a Twist sketch designer

Sketchabilities design team

Twisted Sketches design team

Secondary Sidebar

Topic categories

  • 12×12 layouts using 6×6 paper
  • Cards
  • Freebies/giveaways
  • Layouts based on sketches
  • Layouts using 3×4 journaling cards
  • My scrapbook layouts
  • Reviews
  • Scrapbook products
  • Sketches
    • My sketches
  • That redo that you do
  • Tips
  • Tutorials
  • Uncategorized

Archives

Tags

1 photo 2 photos 3 photos 4 photos American Crafts banner Basic Grey Bella Blvd Blogtoberfest border punches cards Christmas Copic coloring Crate Paper Creative Scrappers Echo Park emotional journaling Fancy Pants Halloween hand stitching Jillibean Soup Little Yellow Bicycle Making Memories Martha Stewart Crafts My Mind's Eye October Afternoon one-page layouts Pebbles Pink Paislee rosette Scrap & Music sketches scrapbook philosophy Silhouette Simple Stories Sketches with a Twist Sketch Support Spellbinders stamping Stuck?! Sketches Tim Holtz Distress Ink tutorial Twisted Sketches two-page layouts vintage photos We R Memory Keepers

Copyright © 2010-2018 The Constant Scrapper