• Skip to primary navigation
  • Skip to main content
  • Skip to primary sidebar
  • Skip to secondary sidebar
  • Home
  • About me

The Constant Scrapper

If I'm not scrapbooking I'm thinking about scrapbooking!

Reviews

My favorite 15 layouts of 2015

January 2, 2016 By Janice Daquila-Pardo Leave a Comment

The Constant Scrapper Best of 2015

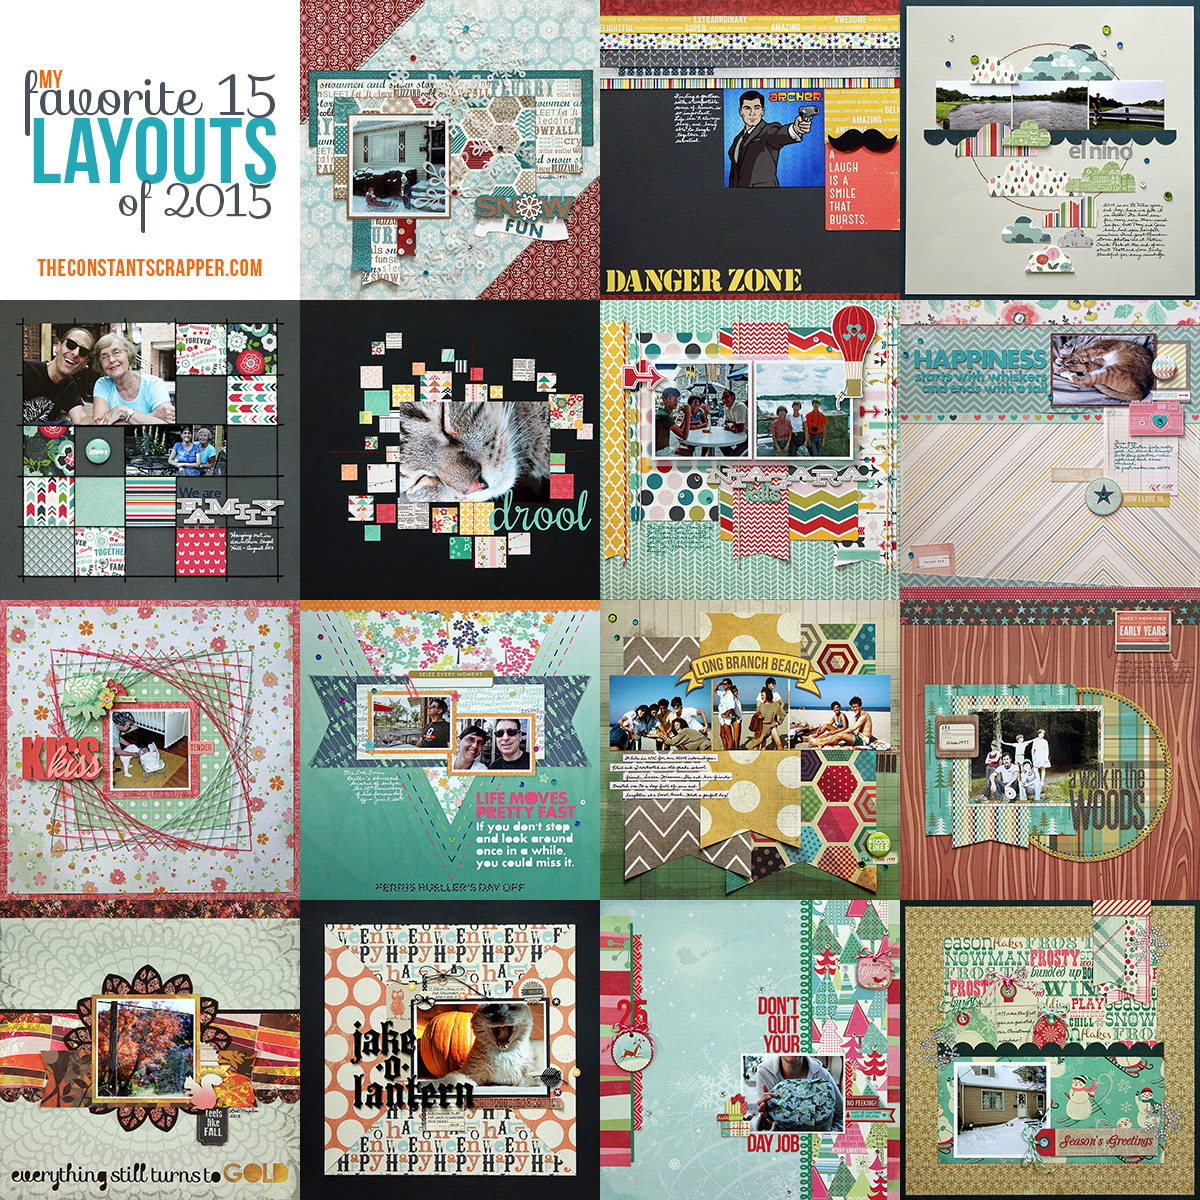
We have all seen our share of end-of-year reviews for the past few weeks—the celebrities we’ve lost, the big news stories, the best books/films/you-name-it. To be honest, I avoid most of them because, well, there are just too darn many (and they start to repeat each other). But I am drawn to the best-of lists because I like the idea of celebrating the outliers in a category.

So I decided to go through all my blog posts for 2015 and pick out my favorite 15 projects. It was fun to briefly review my crafty output for the year and the memories on which they focused. And it was a bit of a challenge to narrow down my favorites. Should I choose based on how I felt about the result? How much I enjoyed the process? My attachment to the subject? Important decisions had to be made.

In the end, it was a blend of those, as most decisions are. I can tell you that all of these pages made me happy to look at and proud to take credit for. And that’s The Constant Scrapper Best of 2015 report. Now it’s time to make new stuff!

Filed Under: My scrapbook layouts, Reviews

Tim Holtz Distress Markers 5-pack color lists

September 27, 2012 By Janice Daquila-Pardo 74 Comments

When the Tim Holtz Distress Markers by Ranger came out months back, I loved the idea. But rather than buying the whole set before even getting to try out one marker, I decided to look for ways to buy them in smaller chunks. So, when I started seeing 5-packs of these markers at Hobby Lobby and Michaels I excitedly bought them (with coupons, of course).

But I quickly became distressed (pun fully intended) at the lack of information on the product packaging. Some of the sets had names—such as Memories Past and Country Fair—but these were only printed on the store SKU tag and not the bubble pack, and not all of them even had names. Kind of weird.

But the bigger problem was that the color names of the included markers weren’t listed anywhere! It wasn’t printed on the cardboard backing. And the way the markers were packed in the plastic made it so that only one marker was turned up and readable.

Then, when I came home to look for the list online I still couldn’t find any details! The reason I was so diligent about finding this info is that I wanted to be sure, before opening the product and making it harder to return, that none of the sets had duplicate colors.

Well, I finally decided, after comparing all the sets and figuring that there didn’t look to be any color overlap, that I would just open them. It worked out because I now have 25 of the colors and I like the markers. But my frustration over not finding these colors listed anywhere turned into a little project to benefit my readers. And so I give you…

The Distress Markers 5-pack color lists:

TimHoltzDistressMarkersClutteredCellar

Cluttered Cellar includes: stormy sky, forest moss, fired brick, spiced marmalade and dusty concord

TimHoltzDistressMarkersCountryFair

Country Fair includes: peeled paint, barn door, mustard, faded jeans and black soot

TimHoltzDistressMarkersEstateSale

Estate Sale includes: frayed burlap, weathered wood, shabby shutters, tattered rose and Victorian velvet

TimHoltzDistressMarkersMemoriesPast

Memories Past includes: vintage photo, wild honey, crushed olive, tumbled glass and worn lipstick

TimHoltzDistressMarkersVictorianShabby

Victorian Shabby includes: antique linen, broken china, bundled sage, spun sugar and picket fence

I really hope this is helpful to you. If you have found any other color collections of these markers, will you please leave me a comment to tell me the name of it and which colors are included?

Update

I’ve received a helpful update from reader Monica, who says there is another 5-piece set called Hillside, which has the following colors:
Aged Mahogany
Dusty Concord (also in Cluttered Cellar)
Pine Needle
Spiced Marmalade (also in Cluttered Cellar)
Walnut Stain

It sounds like Ranger isn’t going to make it easy for us to collect all the distress markers through sets, which is unfortunate because I think it makes them seem less customer friendly. It seems like a marketing ploy to force us to buy duplicates just so we can take advantage of the better pricing that bundles afford. Do you think you will buy the “Hillside” set even if you already have the others, or are the duplicates going to keep you from making the purchase?

Update #2 (2014)

Tim Holtz Distress Markers now total 49 colors (the original full set included 37 colors). The new colors are available as a 12-color set (in their own 2-inch storage tube) for those who bought the original full set and want to update to the new full set). You can also buy the whole updated 49-color set (in 4-inch storage tube). Or you can buy individual colors as open stock.

The colors included in the 12-marker seasonal set are:
Evergreen Bough
Festive Berries
Gathered Twigs
Iced Spruce
Mowed Lawn
Peacock Feathers
Picked Raspberry
Ripe Persimmon
Salty Ocean
Seedless Preserves
Shaded Lilac
Squeezed Lemonade

There are more sets to add to your watch list:
Boardwalk:
Evergreen Bough
Shaded Lilac
Salty Ocean
Festive Berries
Squeezed Lemonade

Marketplace:
Mowed Lawn
Peacock Feathers
Picked Raspberry
Ripe Persimmon
Seedless Preserves

Update #3 (2015)

Thank you to reader Katie, who left a helpful comment about finding the 12-piece tube with all the 2015 monthly releases at Hobby Lobby:
Mermaid Lagoon
Hickory Smoke
Cracked Pistachio
Blueprint Sketch
Twisted Citron
Abandoned Coral
Wilted Violet
Lucky Clover
Fossilized Amber
Carved Pumpkin
Ground Espresso
Candied Apple

Filed Under: Reviews, Scrapbook products, Tips

Blogtoberfest Day 8

October 8, 2011 By Janice Daquila-Pardo Leave a Comment

Celebrate Blogtoberfest with me all month!

Card kit review

Last year I found a Basic Grey Halloween card kit for sale at Big Lots. It was from BG’s 2009 Eerie collection and cost only $5.00, as opposed to the original price tag of $14.99. I thought that $5.00 might be worth paying to find out if I liked using kits. I don’t normally love the idea of card and layout kits; they remove that part of the crafting process that I love—making all the creative choices. But I also don’t believe in saying I dislike things I haven’t tried, so I bought the kit.

Basic Grey's Eerie card kit

Today I pulled out the kit and the extra supplies it calls for—adhesive, pens, etc.—and got to work. The kit contains everything needed to make eight cards (including envelopes). I made four before writing this review, as I wanted to be able to report on how long it took me to complete several, so we could extrapolate the length of time for the whole kit. Following are my perceptions of the kit and the whole process:

  • The four-page instruction sheet shows a black-and-white photo of each card and lists the step-by-step instructions. It’s well designed and easy to read.
  • There are two sheets of die-cuts and one sheet of self-adhesive chipboard pieces included. Each piece is numbered according to the card it fits. This seems like a good system, but I found locating all the items for one card a little difficult because they aren’t grouped together. But this is just a nit.
  • It took me 76 minutes to complete four cards. At that rate, it would take me just under three hours to finish them all. I am not a speedy crafter by any means, so this is good time for me! Your assessment may differ based on how quickly you can usually create a card.
  • Making these cards confirmed for me that I am not a kit lover. I don’t craft just to have the final project in hand. I want to create; I crave the process. So, punching out precut strips of patterned papers and shapes and gluing them to the base card just doesn’t do it for me. Some designer(s) at Basic Grey got to have the fun that I want out of crafting. I just assembled stuff. Not that fun, really.
  • Just because I don’t like using kits doesn’t mean I think there’s no place for them. If I was in a real hurry and had to have homemade cards for some reason, I might turn to a kit. All the decisions are made for you, and you don’t have any leftover scraps of patterned paper when you’re done.
  • Basic Grey’s kits are quite nice. The instructions are nicely done. Their paper designs are always beautiful. The card sketches are cute but not too complex. So, if you’re looking for a quick way to make eight coordinated and well-designed cards, I can certainly recommend their kits.

Filed Under: Reviews Tagged With: Basic Grey, cards, Halloween

Field notes from a scrapbook convention

September 20, 2011 By Janice Daquila-Pardo Leave a Comment

This weekend I attended the Creating Keepsakes Scrapbook Convention in San Marcos, Texas. I have made the short drive from Austin to San Marcos for this convention two or three other times over the years, and I would say this is the best one I’ve been to so far. The main reason I give this year’s event the highest marks yet are because many of the vendors actually brought new products with them that I haven’t yet seen at my local stores!

You might be thinking, “Jan, do you mean that I could set aside a day of my weekend, drive to San Marcos and pay my $10 to get in the door at the Embassy Suites—all just so that I can shop for new scrappy products—only to find old merchandise?” To which I would think, “Yes, that’s exactly what I mean.”

There have been years that I’ve found tables full of what looked like old inventory the vendors had dug out of the farthest corners of their warehouses. Very disappointing, not to mention inappropriate! How many scrapbook enthusiasts who would make the time and effort to pay to shop for their hobby would be interested in anything but the newest offerings? So, whether the improvement came about because of attendee feedback (which I certainly gave in past years) or because the vendors realized that they weren’t doing their sales numbers any favors, I don’t know. I’m just happy to report that I came home with more brand-new items this time. Score!

Tips for going to a scrapbook convention

I was also thinking about the things I’ve learned by going to these a few times and have put together a little list of tips for any of you who haven’t been to a local convention and are thinking of going to the next one that comes to town:

  • Dress for comfort. You’re on your feet all day in an over-air conditioned hotel/convention center. Dress in layers and wear tennis shoes.
  • Take your own shopping bag. You aren’t allowed to bring wheeled craft carts into the shopping area (it would make things way too crowded), but that doesn’t mean you can’t bring a bag for carrying what you’ve bought. The first year I went I just carried around the bags that my purchases came in, and that became a pain because they really started cutting into my hands after a bit. So I always take a craft bag that straps across my chest and can hold 12×12 paper without bending it. I just slide all my purchases right into that baby and keep my hands free for more important things.
  • Take cash. Yes, most (maybe all) of the vendors take credit cards. However, they don’t all spring to have a telephone line turned on at their booth. This means they run your credit card the old-fashioned way: with carbon paper. I suggest avoiding those kinds of worries by using cash whenever you can. And then only pull out your credit card when it’s a larger purchase and you know they are running it through a phone line.
  • Go as an informed shopper. I’m not suggesting that you spend hours finding out what’s new from all your favorite craft companies just so that you’ll know what products you might see at the convention and what they should cost. That would take way too much work. However, if there’s some specific tool that you’re looking for I would suggest you read up on it a little. Make sure that you know if there are different versions available and what the retail price is so that you know whether the “show deal” is really a deal at all.
  • Don’t be afraid to go alone. I think some people miss out on going to events like this because they don’t know anyone who is interested or available to go with them. I have found that going alone is still lots of fun! I enjoy moving at my own pace and looking closely at one booth and then completely skipping the next, which is much easier to accomplish if you need only please your own tastes and interests. I also find it fun to talk to the friendlier vendors. I never feel lonely when I’m there. Don’t get me wrong here; I have gone with friends and had a great time! In fact, this year I ran into a friend of mine almost as soon as I arrived, and we spent several fun hours together perusing and purchasing. I’m just suggesting that you go whether you have a girlfriend to accompany you or not.
TinaJaniceCKC

Happily, I bumped into my friend, Tina, and we spent time shopping together!

Overall, I think of going to this kind of scrapbook convention as being a lot like spending the day at an amusement park. If you dress for comfort, are prepared to stand in some lines, understand that the food is going to be overpriced, pace yourself and don’t mind occasionally bumping into other people in the crowd, then you should have a great time enjoying the roller coasters!

Filed Under: Reviews, Tips

Scrapper on the edge: Part 2 + FREEBIE

April 20, 2011 By Janice Daquila-Pardo 9 Comments

If you haven’t already read Part 1, you can get the background story here.

The other day I ranted a bit about a problem that I believe must affect other scrappers as it does me. I’m talking about sending your photos out to be printed (at Walgreens, Costco, Snapfish, etc.) and getting them back with the edges cut off. Unacceptable!

Now, if I printed my photos just as they come from my camera I probably wouldn’t notice this problem (as the woman at the Walgreens photo counter pointed out, nobody else had ever seemed bothered by it). But I don’t; I spend a good deal of time in the process of preparing to print them:

  1. I choose which photos I’m going to work with on a layout.
  2. I decide in what size I’ll need each of them.
  3. I color correct them.
  4. I crop them to size.
  5. And sometimes I even put special frames on them.

So nothing about my photos—when they’re finally uploaded to the printer—is accidental. Which is why I don’t want all that effort to feel like a waste of time when I see what the photo labs do once they get hold of them!

On a side note: One of my sweet readers, SammyD, works in a photo lab and left me some really helpful information in the comments on my Part 1 post. She explained that the cropping happens because most cameras take photos with a 6×8 ratio (compared to the 2×3 ratio of most of the photos we print). She suggests adding a small border (she says 2 mm.; I say 0.0625 in., or 1/16th) to your photos before submitting them may help with this problem. Want more of an explanation of aspect ratios in still photography? Read here.

My reaction, though, was to devise a test image that I could upload to various printers in order to determine:

  • where I can get my photos printed that will return to me something that looks more like what I submitted without enlarging my original and then cutting off the edges…or barring that
  • how I can adjust my photo prep to account for the crap photo labs do with them

The test image I created includes four 1/16th-inch frames in varying colors, making it is easy to determine what has been cut off by the printer. I submitted this test image to three photo labs in town (labs that I thought many towns are likely to have), and here are the results. Please click on each image to really see the cropping details/differences. Also, you’ll probably notice that there’s quite a bit of variation in the colors that came back from each lab. Let’s save that conversation for another day! 🙂

TestPrintImage

The original test image that I sent to the printers

Notice how on the Walgreens photo most of the outer blue border is missing, and the image is tilted. The left edge has also been cropped closer than the right.

WalgreensTest

This is the result from Walgreens.

The photo I received from Costco was cut off more at the top than the bottom and lost pretty much the whole outer 1/16th-inch border and part of the second border.

CostcoTest

This is the result from Costco

Archiver's version came out missing all of the outer border and almost all of the second!

ArchiversTest

This is the result from Archiver's

So, it’s time for the FREEBIE: download the full-resolution version of the test image I created and send it to your printer of choice. I recommend sending it with each of your next several orders just to establish for yourself what kind of cropping they do and with what consistency. Then you can make adjustments that will lead to getting your photos back more as you envisioned them to begin with.

If you download this file please leave me a comment to let me know. I do hope this is helpful to you.

There, now I feel a little better! 🙂

Filed Under: Freebies/giveaways, Reviews

Next Page »

Primary Sidebar

Thanks for visiting!

Hi, I'm Janice.

Follow me

Follow on Bloglovin

My sketches on Pinterest

Design team

I am a proud Stuck?! Sketches designer!

Past design teams

Scrap & Music sketch designer

Creative Scrappers sketch designer

Sketches With a Twist sketch designer

Sketchabilities design team

Twisted Sketches design team

Secondary Sidebar

Topic categories

  • 12×12 layouts using 6×6 paper
  • Cards
  • Freebies/giveaways
  • Layouts based on sketches
  • Layouts using 3×4 journaling cards
  • My scrapbook layouts
  • Reviews
  • Scrapbook products
  • Sketches
    • My sketches
  • That redo that you do
  • Tips
  • Tutorials
  • Uncategorized

Archives

Tags

1 photo 2 photos 3 photos 4 photos American Crafts banner Basic Grey Bella Blvd Blogging for Scrapbookers class Blogtoberfest border punches cards Christmas Copic coloring Crate Paper Creative Scrappers Echo Park emotional journaling Fancy Pants Halloween hand stitching Jillibean Soup Little Yellow Bicycle Making Memories Martha Stewart Crafts My Mind's Eye October Afternoon one-page layouts Pebbles Pink Paislee rosette Scrap & Music sketches scrapbook philosophy Silhouette Simple Stories Sketches with a Twist Sketch Support Spellbinders stamping Stuck?! Sketches tutorial Twisted Sketches two-page layouts vintage photos We R Memory Keepers

Copyright © 2010-2018 The Constant Scrapper