• Skip to primary navigation
  • Skip to main content
  • Skip to primary sidebar
  • Skip to secondary sidebar
  • Home
  • About me

The Constant Scrapper

If I'm not scrapbooking I'm thinking about scrapbooking!

Tutorials

One is silver, the other is gold

January 8, 2014 By Janice Daquila-Pardo 1 Comment

TheOtherIsGold_Daquila-Pardo

Make new friends, but keep the old. One is silver, the other is gold.

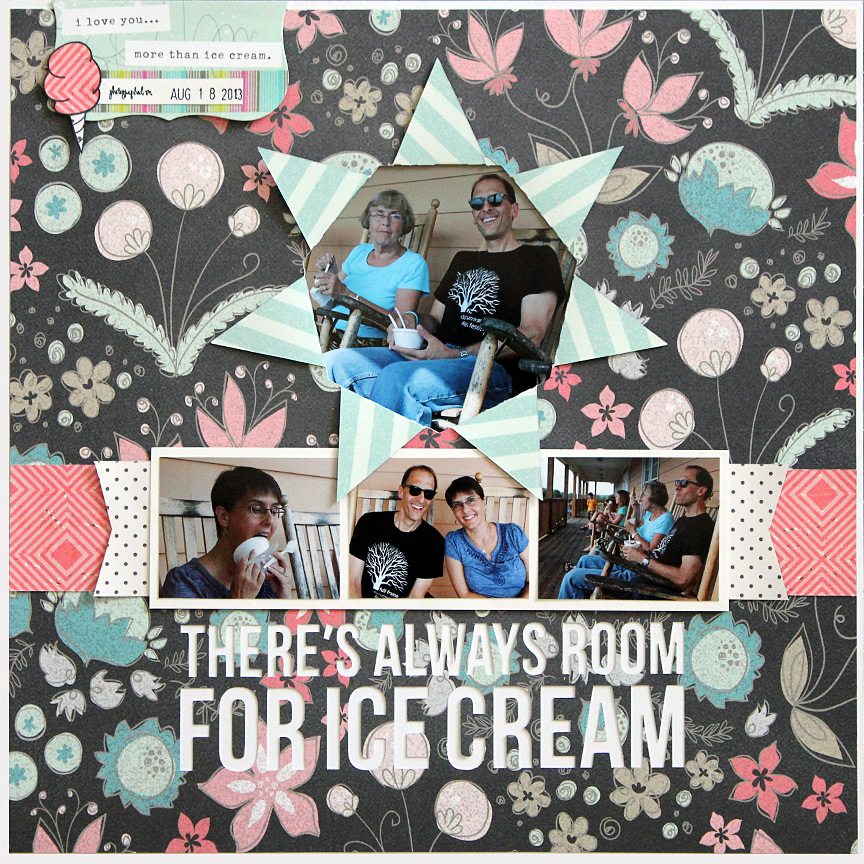
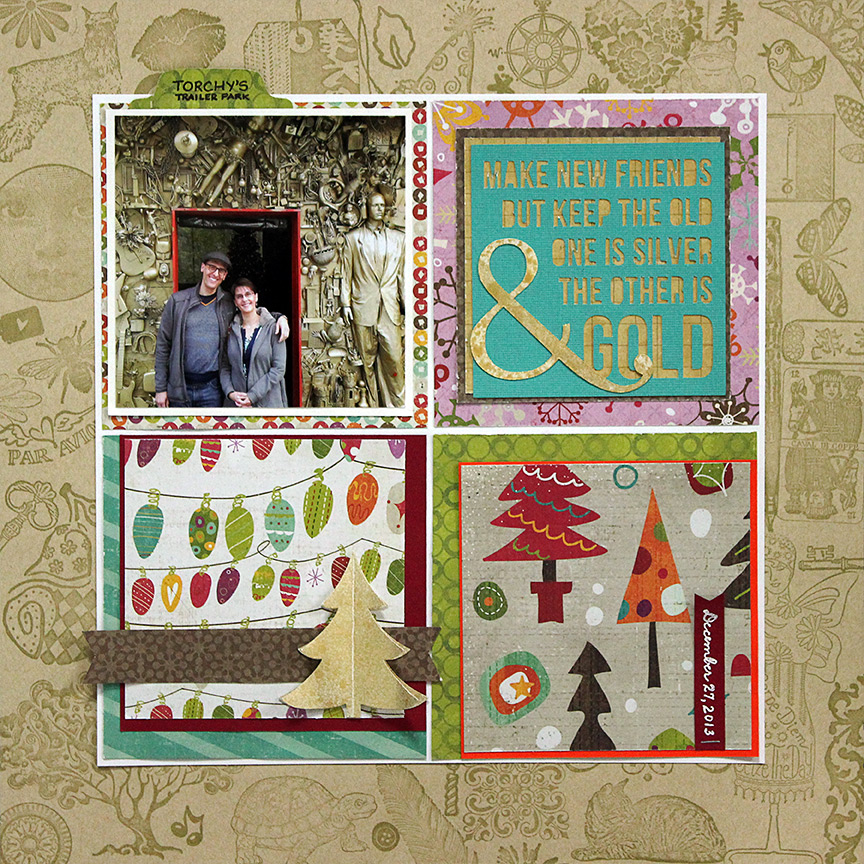
I thought I had just about finished this layout with a photo of me and my baby brother in front of this cool gold artifact wall in downtown Austin. Matt and I had just picked up Phil from the airport for his week-long visit from Durham, NC, and whisked him to Torchy’s Tacos for lunch. As we were leaving we stood for a few minutes marveling at the work that went into making this artist’s vision a reality and then decided to snap a photo in front of it.

It was when I sat staring at my almost-finished project that I realized what it needed—a gold artifact border! Burning with the desire to see this happen, I pulled out a slew of old rubber stamps and started stamping in gold pigment ink. Yes, it was time-consuming, but it was also lots of fun. I just don’t stamp on my pages often enough, so this felt great.

Once my border was finished I started rethinking my plan for a title. It had been my intention to go with something about keeping Austin weird. But focusing on the gold motif made me think of that little children’s song, “Make new friends.” Remember it? Well, I went looking for the words to it and decided it was just perfect for a layout about my bro because he’s my oldest and goldest friend.

Make new friends
Make new friends,
but keep the old.
One is silver,
the other is gold.
A circle is round,
it has no end.
That’s how long,
I will be your friend.
A fire burns bright,
it warms the heart.
We’ve been friends,
from the very start.
You have one hand,
I have the other.
Put them together,
We have each other.
Silver is precious,
Gold is too.
I am precious,
and so are you.
You help me,
and I’ll help you.
And together
we will see it through.
The sky is blue,
The Earth is green.
I can help
to keep it clean.
Across the land,
Across the sea.
Friends forever
we will always be.

Product/technique notes

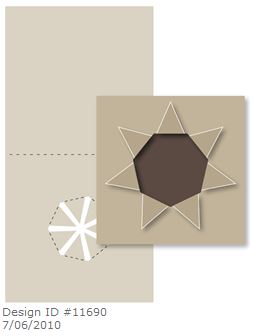
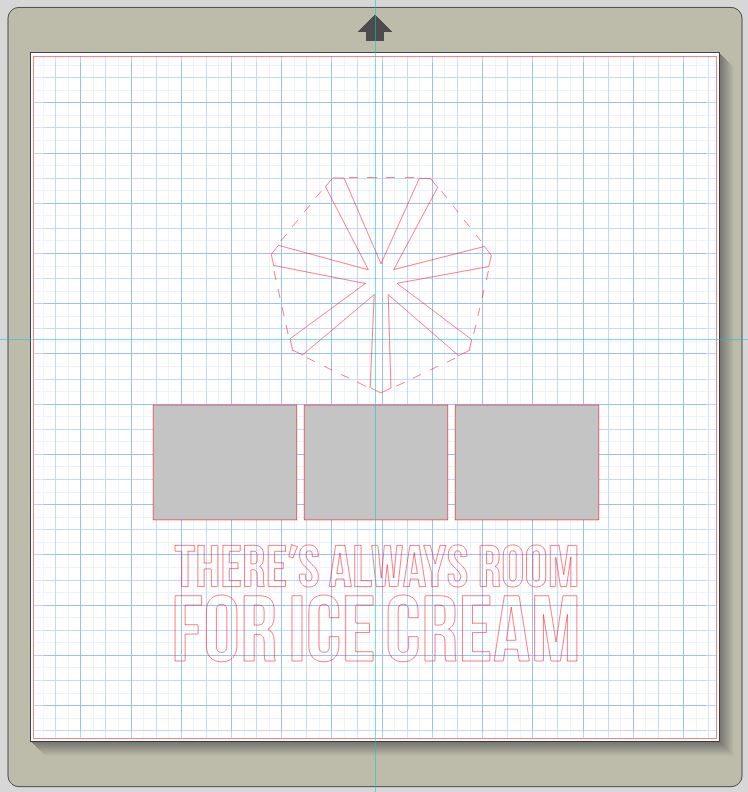
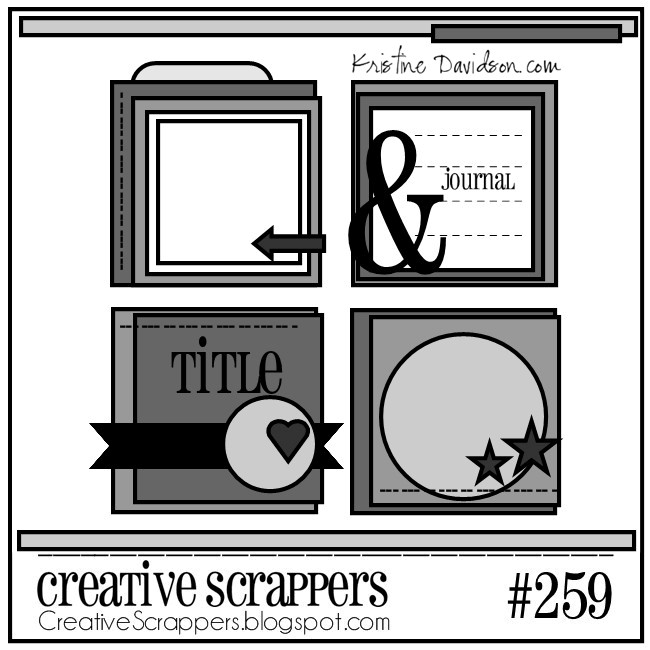
I had such a good time creating this layout. I followed the sketch below from Creative Scrappers and used patterned papers from Crate Paper’s “Snow Days” 6×6 pad. Then, because I really loved that crazy artistic wall of gold artifacts in the photo, I pulled out a ton of old rubber stamps and created a border of gold icons around the whole page. I also pulled out my gold lame Heidi Swapp Color Shine and created the ampersand in the title block and the Christmas tree in the bottom left.

Creative Scrappers sketch #259

Technique1

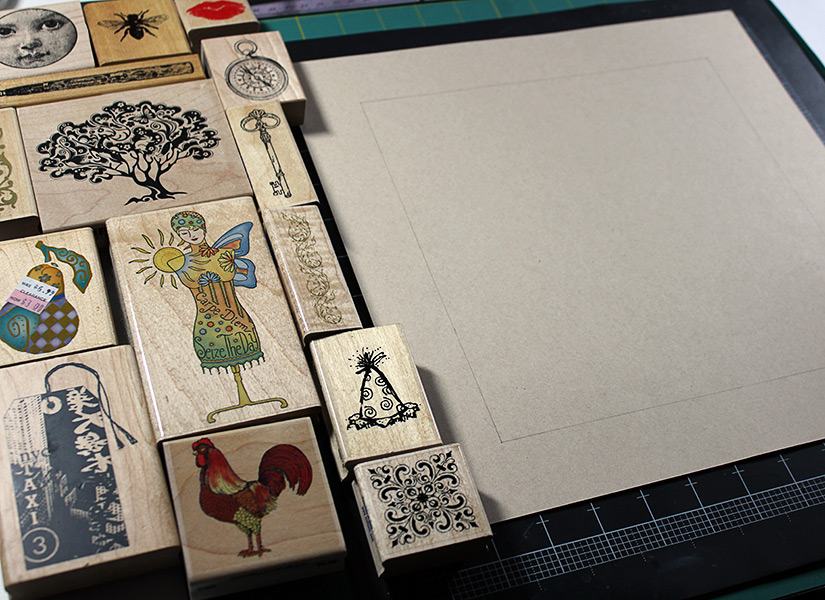
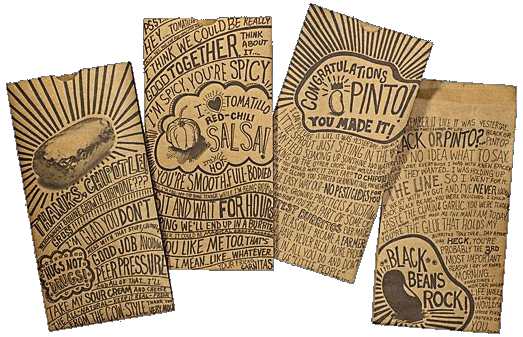
You can see where I pencilled in a border on my kraft background paper as a guide. Then in the interest of time, I decided only to use rubber stamps because cleaning and putting away clear stamps would take a lot more effort. I gathered a group of larger images from my collection and stamped those first.

Technique2

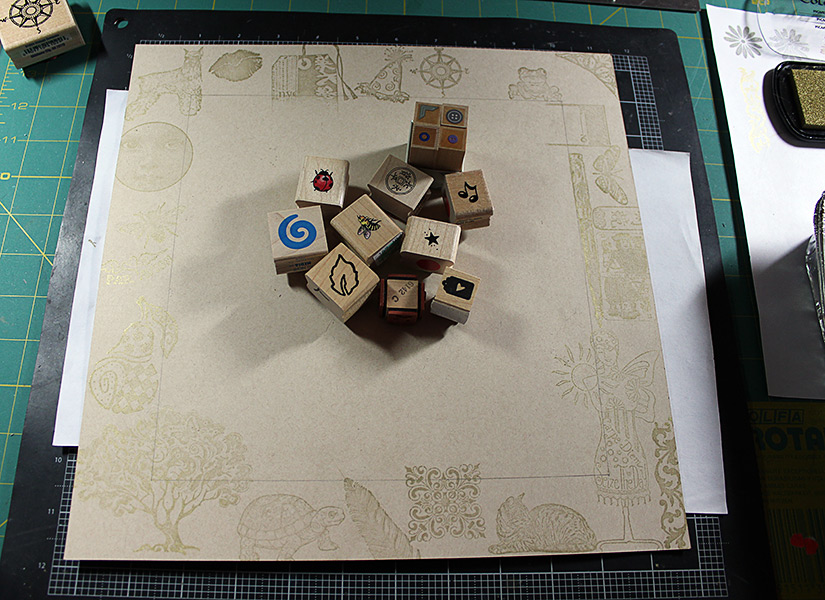
After stamping with the large rubber stamps, I filled in around them with smaller ones.

Filed Under: 12x12 layouts using 6x6 paper, Layouts based on sketches, My scrapbook layouts, Sketches, Tutorials Tagged With: 1 photo, Christmas, Crate Paper, one-page layouts, Silhouette, stamping

There’s always room for ice cream

October 9, 2013 By Janice Daquila-Pardo Leave a Comment

RoomForIceCream3_Daquila-Pardo

I know it's hard to believe, but I actually do love these two more than ice cream.

I thought I would share a Silhouette technique today. I had a lot of fun concocting this layout in my head, then in my Silhouette Studio software and finally in physical form.

I completed this look by building the page as much from the back as from the front. Here’s how:

I was looking for a novel way of highlighting my main photo, so I started surfing my Silhouette library for ideas. When I saw this “Folded Sunburst Card” shape, the light bulb went on. Why not cut the sunburst aperture from my background paper and put the photo behind it?
the Silhouette shape I used to highlight my main photo

So I opened the file and deleted all the card bits, leaving only the sunburst. I re-sized the shape to be a little smaller than a 4 x 4 photo and dragged it to the top third of a full 12 x 12 page in Silhouette Studio.

To add to the building from beneath theme, I set up my title to cut from the background paper as well. So that I would be sure to leave enough room between the sunburst and the title for the other photos I planned to use, I added those to the design in Silhouette Studio but I set them to “no cut.” Like this:
How my file looked before cutting

So that’s it. I laid down my patterned paper (from My Mind’s Eye “Cut and Paste: Flair” collection), cut this out all at once, backed it with white card stock and then built my page on top of it. And now I have a layout that has lots of depth and texture without lots of bulk.

Oh, and the photos are from a stop we made at a neat little ice cream place in North Carolina while I was home visiting Mom and Phil this August.

Filed Under: My scrapbook layouts, Tutorials Tagged With: 4 photos, My Mind's Eye, one-page layouts, Silhouette, tutorial

Why we are vegetarians

October 1, 2012 By Janice Daquila-Pardo 2 Comments

Vegetarians_Daquila-Pardo

For World Vegetarian Day I decided to sit down and document why my husband and I returned to a vegetarian lifestyle last October.

When I found out that today is World Vegetarian Day, I decided that the best way to recognize it would be to do a layout about why Matt and I have become vegetarians.

We actually tried a vegetarian lifestyle several years ago, but we didn’t do enough learning about how to do it well. We replaced way too many of our meat-centric meals with carbs because they’re so easy. But because of that we gained weight, which certainly didn’t improve our health, which was the original reason for starting the change in diet. So we eventually gave it up.

Then, last October, as Matt was getting more into running and losing weight, he began to read more and more about the benefits to an athlete of being vegetarian. So we decided to try again, but this time we did more homework and it’s been a much more satisfying change.

The rest of the reasons for being vegetarian apply to us as well. It started to become harder for us to be passionate animal rescuers and not question our continued willingness to eat meat. We also believe that it’s better for the environment not to allot so much of our land to raising cattle, etc.

There’s a ton of information out there that can convince you to give up meat if you’re interested, but my real reason for doing this layout was to document in our scrapbook album this part of our lives and why it’s important to us.

The journaling

Back when I first saw these bags from Chipotle Mexican Grill, I really wanted to recreate the look with the journaling on one of my layouts. Then, when I thought about doing this page, that idea came back to me. The organic feel of it seemed like the perfect fit for my “granola” message, so I hand-lettered my journaling in the same style.

The design of the Chipotle bag that I used as inspiration for my journaling on this layout

Product/technique notes: I found the amazing photo I used on my page on the Mercy for Animals blog. The patterned paper is from the BasicGrey Konnichiwa collection.

Filed Under: My scrapbook layouts, Tutorials Tagged With: 1 photo, Basic Grey, emotional journaling, one-page layouts

Oasis

July 16, 2012 By Janice Daquila-Pardo Leave a Comment

Oasis_Daquila-Pardo

I swear I heard a rattlesnake while we were on this walk into hell.

To be fair, it was my idea for us to go for a hike on July 4th. There’s a trail running along Brushy Creek Road that I see lots of walkers, runners and cyclists using, but we had not tried it yet. So we agreed to go first thing in the morning to check it out. Then, first thing in the morning turned into noon, and I suggested we wait for another morning. But Matt insisted we’d be fine. So we slathered ourselves with sunscreen, filled our water bottles and headed out.

That path. Went on. Forever. And I swear that ninety percent of it was in full sun. Did I mention that it got to nearly 100 degrees? And there were vultures circling overhead? Yeah.

My repeated requests to turn back fell on deaf ears; Matt really wanted to see where that path led.

Just as I started feeling sick from all that heat, and we were about to run out of the water we had been rationing, it appeared. I actually asked Matt if it was a mirage or an oasis!

He said, “It must be an OASIS because I can see it, too!”

It was a lovely little community water park…with families picnicking, kids playing and squealing and wonderful, cold, restorative water spraying everywhere. We looked at each other in amazement. And then ran in.

Matt is enjoying the splash park.

What could have been better than to find this?

I think it's awesome that this free splash area is offered by the park system.

Product/technique notes: I saw this distress ink watercolor technique over at Kristina Werner’s card blog and decided I wanted to use it on this layout because of my water theme. I pulled out this piece of patterned paper from Little Yellow Bicycle (I’m using both sides of just one piece of paper on this page) and thought it would be a great way to represent both the searing sun and then the bright colors and fresh feeling of the splash park. So I chose colors of distress ink to match the stripes in the paper (wow, did they match well!) and created swatches of splotchy watercolored paper. Then I cut out each letter of my title from a different swatch.

WatercolorSwatches

Just look at how my swatches match the paper!

Filed Under: My scrapbook layouts, Tutorials Tagged With: 6 photos, border punches, Little Yellow Bicycle, one-page layouts

The Lord God made them all

June 2, 2012 By Janice Daquila-Pardo 15 Comments

It’s already time for the June Sketches With a Twist challenge—the last design of my term with them. I am very proud to have created this sketch, although I’ll admit that it’s a little harder than usual, which is why I’ve included a tutorial below for making the Cathedral Window quilt pieces! Here’s a little peek at my new sketch:

The Sketches With a Twist June sketch

The twist this month is to incorporate fabric into your design. I’m not a seamstress (yet), so I used felt! Felt is fabric, isn’t it? 😉

Rescues_Daquila-Pardo

Every animal we have rescued stays in my heart.

All things bright and beautiful,
All creatures great and small,
All things wise and wonderful:
The Lord God made them all.

~Cecil F. Alexander, Hymns for Little Children, 1848

Matt and I are rescuers. Animals in need find us, and we can’t turn away. It’s added a lot of joy to our lives to open ourselves to this avocation. And of course, with the joy comes a bit of pain because not all our rescues can be saved. As in most things that matter, though, the joy makes the pain worth enduring.

This layout features photos of just three of the animals we’ve helped:

  • The possum we named Head (after a character with a large head in So I Married an Ax Murderer). Sadly, Head was too injured by the car that hit him, and he did not make it.
  • The chicken Matt rescued from Mopac Highway and was promptly named…Mopac…before we found her a home on a little farm in Buda, Texas.
  • And the German short-haired pointer who we named Budro (for the dog in Grosse Pointe Blank) before placing him with the local German short-haired pointer rescue group.

My layout is intended to celebrate all the animals we’ve rescued and to symbolize the way they each add themselves to the quilt of our lives.

The tutorial

So you think this sketch looks intimidating? I’m here to help! After creating my layout with this sketch, I realized that I could probably help others use it if I revealed a few of the measurements and techniques I used.

The three photos on this sketch are 3 inches from corner to corner, not 3 inches square. A square that measures 2⅛ will have a diagonal measurement of 3 inches, so that’s the size to which you should crop your photos.

For the nine Cathedral Window quilt pieces you see on the sketch, you’ll need to punch either nine 3-inch circles of double-sided patterned paper OR nine 3-inch circles of single-sided patterned paper and nine 2-1/16-inch squares of different patterned papers. I wanted all my folded pieces to be the same pattern, so I used the second method for my quilt pieces.

Here's a template for the Cathedral Window quilt pieces you'll need to cut.

Place your 2-1/16-inch squares centered on your circle and score around the outside edges. Once you fold up the four edges you’ll have a 2⅛-inch square quilt piece.

Here is a template I created to help you place your quilt pieces (if you want to follow the sketch exactly). I used these measurements, and everything lined up just right! Click on this smaller image to download the full-sized version.

Here's a template for placing the Cathedral Window quilt pieces on your layout.

I really hope this tutorial is helpful to those of you who want to use my sketch. I am very happy with how my layout looks, so I hope you’ll try it with a few of your photos, too. And don’t forget to link up your page to the Sketches With a Twist challenge.

Filed Under: 12x12 layouts using 6x6 paper, Layouts based on sketches, My scrapbook layouts, Sketches, Tutorials Tagged With: 3 photos, Basic Grey, one-page layouts, Sketches with a Twist

« Previous Page
Next Page »

Primary Sidebar

Thanks for visiting!

Hi, I'm Janice.

Follow me

Follow on Bloglovin

My sketches on Pinterest

Design team

I am a proud Stuck?! Sketches designer!

Past design teams

Scrap & Music sketch designer

Creative Scrappers sketch designer

Sketches With a Twist sketch designer

Sketchabilities design team

Twisted Sketches design team

Secondary Sidebar

Topic categories

  • 12×12 layouts using 6×6 paper
  • Cards
  • Freebies/giveaways
  • Layouts based on sketches
  • Layouts using 3×4 journaling cards
  • My scrapbook layouts
  • Reviews
  • Scrapbook products
  • Sketches
    • My sketches
  • That redo that you do
  • Tips
  • Tutorials
  • Uncategorized

Archives

Tags

1 photo 2 photos 3 photos 4 photos American Crafts banner Basic Grey Bella Blvd Blogtoberfest border punches cards Christmas Copic coloring Crate Paper Creative Scrappers Echo Park emotional journaling Fancy Pants Halloween hand stitching Jillibean Soup Little Yellow Bicycle Making Memories Martha Stewart Crafts My Mind's Eye October Afternoon one-page layouts Pebbles Pink Paislee rosette Scrap & Music sketches scrapbook philosophy Silhouette Simple Stories Sketches with a Twist Sketch Support Spellbinders stamping Stuck?! Sketches Tim Holtz Distress Ink tutorial Twisted Sketches two-page layouts vintage photos We R Memory Keepers

Copyright © 2010-2018 The Constant Scrapper