• Skip to primary navigation
  • Skip to main content
  • Skip to primary sidebar
  • Skip to secondary sidebar
  • Home
  • About me

The Constant Scrapper

If I'm not scrapbooking I'm thinking about scrapbooking!

Basic Grey

My first visit to Disneyland

June 30, 2012 By Janice Daquila-Pardo Leave a Comment

FirstDisney_Daquila-Pardo

Who's afraid of the Big Bad Wolf? Not me!

My mom lived in California from the time she was seven until leaving to attend college in Ohio right after high school, but her parents lived there for the remainder of their lives. So, once Mom and Dad started having a family, they frequently traded visits between California and Ohio so Mom’s parents could spend time with their grandchildren. Obviously, I don’t remember this time, but during our visit in June 1968 Grandma and Grandpa took me to Disneyland for the first time.

In creating this layout, I have hit upon a little tip I can share with you about making identifications in vintage photos.

I know the details my mom wrote on the back of these shots—because I scan the fronts and backs of my old photos—which said that it was June 1968 and that I was with the Big Bad Wolf. So right there, I have some great information. But as I was coming to the journaling part of this page, I started worrying about which amusement park featured the Big Bad Wolf. I mean, I thought it was Disneyland, but I wasn’t sure. It could have been Knott’s Berry Farm, which I know we also visited on at least one of our trips to California. And I wanted to be sure before putting pen to paper.

So I turned to Google’s images search and typed in “Disneyland 1968.” I thought this was probably a long-shot way to start my search, but I knew that I could refine it if need be.

First of all, I encourage you to do a search like this just for the fun of seeing the old Kodacolor images of people in their 60s garb and Disneyland in all its 60s glory. Just take a look at a few of the wonderful images I found:

teacup

This image came from http://home.earthlink.net/~rxunit/id15.html.

1968trip3

This image came from http://matterhorn1959.blogspot.com/2009/12/childs-trip-to-disneyland-1968.html.

Disneyland-1968-Tomorrowlan

This image came from http://www.tickledpinklife.com/2011/02/when-the-peoplemover-was-the-futur/

Now back to my objective for doing this search: I hit paydirt on the first try! Take a look at this image and then compare it to the Big Bad Wolf photo on my layout. My heart sped up when I noticed the same building and landscaping (it’s a Micky Mouse flower bed) in the background as in my photo! This was enough proof for me that these photos of mine were taken in the Magic Kingdom.

1968trip2

This image came from http://matterhorn1959.blogspot.com/2009/12/childs-trip-to-disneyland-1968.html.

So the next time you’re casting about for details to include in your journaling or to confirm the places, events or times in your vintage photos, try a Google image search. This is a rich resource for photo research, and I say the more details the better when you’re creating a special page like this.

Product/technique notes: All the patterned papers I used on this project were from the BasicGrey’s Up, Up & Away, PB&J and Serendipity collections. I created the black ribbon scallops using one of the We R Memory Keepers Sew Ribbons tools. The Disney font that I cut using my Silhouette is called Waltograph.

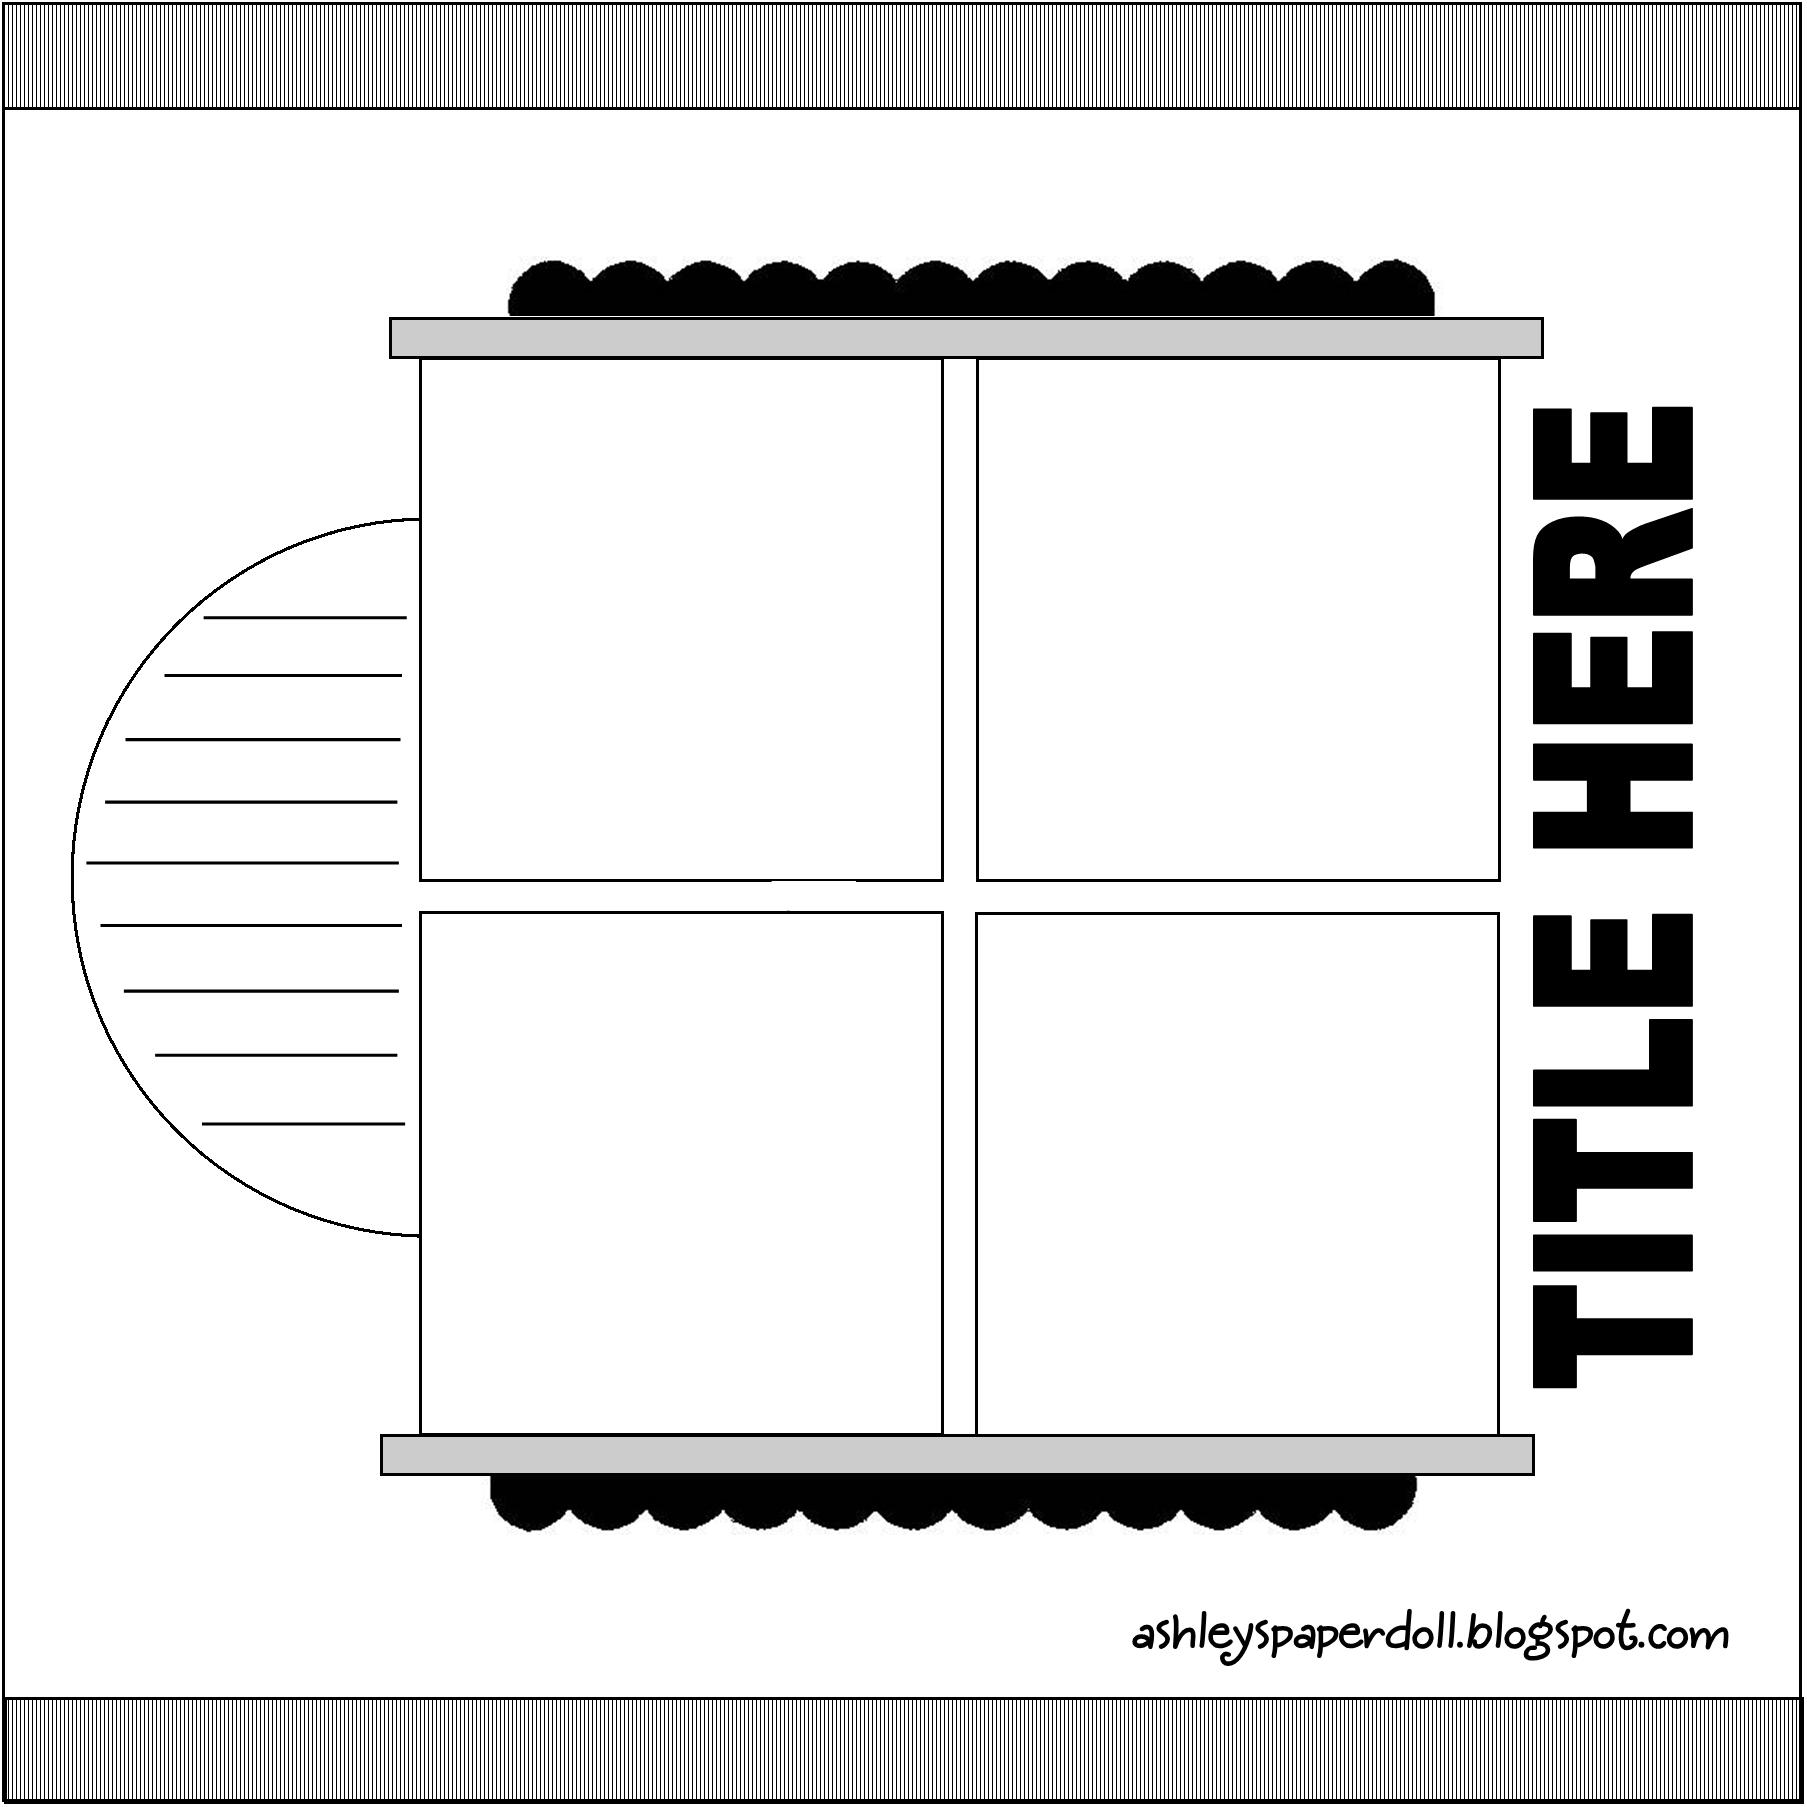
And I used this sketch provided at Club CK for their June challenge:
The June sketch from Club CK

Filed Under: Layouts based on sketches, My scrapbook layouts, Tips Tagged With: 2 photos, Basic Grey, one-page layouts, Silhouette, vintage photos, We R Memory Keepers

Keep Austin Weird Festival + 5k

June 24, 2012 By Janice Daquila-Pardo 2 Comments

KeepAustinWeird3_Daquila-Pardo

There were lots of great costumes to enjoy while attending the Keep Austin Weird Festival and 5k.

Is a part of your summer fun to attend sporting events in support of a family member? Well, now that my husband has started running, it has become a part of mine! As any sports enthusiast or sports enthusiast’s spouse/parent/sibling knows, the participant wants an audience. It’s akin to the question about the tree falling in the woods. If a runner crosses the finish line but no one they know was there to witness it, did they even run the race?

And so I found myself yesterday at the very colorful 10th annual Keep Austin Weird Festival + 5K in downtown Austin, Texas. There was a large stage featuring one band after another, plentiful drinks and food and lots of Austinites doing their utmost to keep their fair city as weird as possible (read: lots of fun costumes). The festival ran from early afternoon on into the night, and the race was set to begin at 7:00 p.m.

Do you have any idea how hot it gets in Texas in the summer? Let me put it this way: When the starter pistol rang out at 7:00, it had come down to 95 degrees. Yes, you do have to be a little crazy to run in this weather, but then I guess that’s part of the point at this festival.

So, just in case you, like me, are the official cheerleader and photographer at events like this, following are a few things I’ve learned about capturing the kind of images you will need to tell the whole story later in your scrapbook pages and/or blog.

Take your best camera

As scrapbookers, one of our most important tools is our camera. If you have more than one—the expensive camera and the little spy camera you keep in your purse at all times—haul along the good one. You will hate the weight of it, as well as fumbling with changing lenses if you have a DSLR, but you will be so much happier with the photos you get. Lug it and love it.

Dress comfortably

When I’m photographer at Matt’s races, I get a workout, too. I wear a large backpack so that I can carry my camera equipment as well as Matt’s supplies, so it gets rather heavy. And I run a lot to be where the shot is. Because of this I wear clothes that are roomy so they don’t cling to me when I sweat, appropriate for the weather and really practical. Yesterday I wore a comfy sun dress and tennis shoes. I’m sure I couldn’t have won any prizes for fashion, but my clothes didn’t hinder me, and that’s all I cared about.

Get before and after photos

Before I let Matt head over to the starting line, I make him stand for a few photos. I want to have shots of him while he’s still fresh and clean as well as nervous for the event to come. I also do my best to be at the finish line to capture his last steps. But I also make sure to shadow him as he huffs and puffs his way over to the water and banana stand. The idea is to get photos of the red face, the sweat and the exhaustion. If he worked that hard, I want to be sure to celebrate it on my layout later.

Capture the local flavor

There’s always something interesting about the location of an event. If it’s in a rural setting, be sure to set the scene by capturing the natural surroundings. If it’s in an urban setting like this festival we attended, get shots of the skyline and the crowds.

Vary the distance of your shots

To tell the whole story of an event, it’s important to get photos that expose different perspectives. You want close-up shots of the sporting equipment your family member is using, images of the crowds, posed and unposed photos of your subject and action shots. Vary the distance, vary the perspective.

Conduct a post-event interview

When Matt is still breathing heavily and high on adrenaline at the end of a race, I like to flip over to the video feature on my camera and spend a few minutes capturing his thoughts about the event. Not only is it great to have this video to watch in the future, but also it provides such a rich source of journaling for that layout you’re going to create later!

Don’t let those summer days drift away without capturing the sun-drenched fun!

Product/technique notes: All the supplies I used on this layout are from the BasicGrey Serendipity and Shine On collections.

Filed Under: My scrapbook layouts, Tips Tagged With: Basic Grey, one-page layouts

The Lord God made them all

June 2, 2012 By Janice Daquila-Pardo 15 Comments

It’s already time for the June Sketches With a Twist challenge—the last design of my term with them. I am very proud to have created this sketch, although I’ll admit that it’s a little harder than usual, which is why I’ve included a tutorial below for making the Cathedral Window quilt pieces! Here’s a little peek at my new sketch:

The Sketches With a Twist June sketch

The twist this month is to incorporate fabric into your design. I’m not a seamstress (yet), so I used felt! Felt is fabric, isn’t it? 😉

Rescues_Daquila-Pardo

Every animal we have rescued stays in my heart.

All things bright and beautiful,
All creatures great and small,
All things wise and wonderful:
The Lord God made them all.

~Cecil F. Alexander, Hymns for Little Children, 1848

Matt and I are rescuers. Animals in need find us, and we can’t turn away. It’s added a lot of joy to our lives to open ourselves to this avocation. And of course, with the joy comes a bit of pain because not all our rescues can be saved. As in most things that matter, though, the joy makes the pain worth enduring.

This layout features photos of just three of the animals we’ve helped:

  • The possum we named Head (after a character with a large head in So I Married an Ax Murderer). Sadly, Head was too injured by the car that hit him, and he did not make it.
  • The chicken Matt rescued from Mopac Highway and was promptly named…Mopac…before we found her a home on a little farm in Buda, Texas.
  • And the German short-haired pointer who we named Budro (for the dog in Grosse Pointe Blank) before placing him with the local German short-haired pointer rescue group.

My layout is intended to celebrate all the animals we’ve rescued and to symbolize the way they each add themselves to the quilt of our lives.

The tutorial

So you think this sketch looks intimidating? I’m here to help! After creating my layout with this sketch, I realized that I could probably help others use it if I revealed a few of the measurements and techniques I used.

The three photos on this sketch are 3 inches from corner to corner, not 3 inches square. A square that measures 2⅛ will have a diagonal measurement of 3 inches, so that’s the size to which you should crop your photos.

For the nine Cathedral Window quilt pieces you see on the sketch, you’ll need to punch either nine 3-inch circles of double-sided patterned paper OR nine 3-inch circles of single-sided patterned paper and nine 2-1/16-inch squares of different patterned papers. I wanted all my folded pieces to be the same pattern, so I used the second method for my quilt pieces.

Here's a template for the Cathedral Window quilt pieces you'll need to cut.

Place your 2-1/16-inch squares centered on your circle and score around the outside edges. Once you fold up the four edges you’ll have a 2⅛-inch square quilt piece.

Here is a template I created to help you place your quilt pieces (if you want to follow the sketch exactly). I used these measurements, and everything lined up just right! Click on this smaller image to download the full-sized version.

Here's a template for placing the Cathedral Window quilt pieces on your layout.

I really hope this tutorial is helpful to those of you who want to use my sketch. I am very happy with how my layout looks, so I hope you’ll try it with a few of your photos, too. And don’t forget to link up your page to the Sketches With a Twist challenge.

Filed Under: 12x12 layouts using 6x6 paper, Layouts based on sketches, My scrapbook layouts, Sketches, Tutorials Tagged With: 3 photos, Basic Grey, one-page layouts, Sketches with a Twist

Basic Grey flickr Friend Reveal

April 27, 2012 By Janice Daquila-Pardo Leave a Comment

I have some fun news today. I got online this morning, started through the Facebook updates that had come in since last night and was greeted with a great surprise. I spied a photo of one of my layouts posted by Basic Grey; they’ve chosen my layout as one of their Basic Grey flickr Friends for April!

Their theme for the month was to use lanterns and banners, and I submitted this project, which you might remember from this April 4th post:

LoveOfTheGame_Daquila-Pardo

These photos of me in my softball uniform are from 1976 and 1977.

For having my layout selected I will receive some BG goodies. When I have them in my hot little hands I’ll show you what I won (and what I’ve made with it, of course).

So, I got that goin’ for me, which is nice. 🙂

Filed Under: My scrapbook layouts Tagged With: banner, Basic Grey

Easter together

April 8, 2012 By Janice Daquila-Pardo Leave a Comment

EasterTogether3_Daquila-Pardo

This is a special photo because all 12 cousins were together for it.

My dad was the middle of three children in his family, who always told him he was the thorn between two roses because he was flanked by sisters. This 1969 photo includes all 12 of Dad and his siblings’ children (Nana and Papa’s grandchildren). All of us together (mostly) posing for a photo on Easter morning. Phil and I, the youngest in the clan, are in the lower left corner. It actually looks like our older cousins are having to tether us to keep us in the photo!

I created this layout based on a scraplifting challenge at BasicGrey’s blog. In place of the hearts punched out of several patterns, I decided to create my background with a Martha Stewart All Over Punch. I punched several rows of designs out of brown cardstock before backing them with six different patterned papers from the BG Sweet Threads 6×6 pad. It creates a lovely quilt-like effect.

I’ll be honest: I wouldn’t recommend trying this technique on a layout about just any photo because it took so long to complete. But for this special photo I’m happy to have taken the time. In fact, keep a lookout for a post coming soon, where I’ll do a review of the Martha Stewart All Over Punch tool and offer some tips for using it.

Filed Under: 12x12 layouts using 6x6 paper, My scrapbook layouts Tagged With: 1 photo, Basic Grey, border punches, Martha Stewart Crafts, one-page layouts, Silhouette, vintage photos

« Previous Page
Next Page »

Primary Sidebar

Thanks for visiting!

Hi, I'm Janice.

Follow me

Follow on Bloglovin

My sketches on Pinterest

Design team

I am a proud Stuck?! Sketches designer!

Past design teams

Scrap & Music sketch designer

Creative Scrappers sketch designer

Sketches With a Twist sketch designer

Sketchabilities design team

Twisted Sketches design team

Secondary Sidebar

Topic categories

  • 12×12 layouts using 6×6 paper
  • Cards
  • Freebies/giveaways
  • Layouts based on sketches
  • Layouts using 3×4 journaling cards
  • My scrapbook layouts
  • Reviews
  • Scrapbook products
  • Sketches
    • My sketches
  • That redo that you do
  • Tips
  • Tutorials
  • Uncategorized

Archives

Tags

1 photo 2 photos 3 photos 4 photos American Crafts banner Basic Grey Bella Blvd Blogtoberfest border punches cards Christmas Copic coloring Crate Paper Creative Scrappers Echo Park emotional journaling Fancy Pants Halloween hand stitching Jillibean Soup Little Yellow Bicycle Making Memories Martha Stewart Crafts My Mind's Eye October Afternoon one-page layouts Pebbles Pink Paislee rosette Scrap & Music sketches scrapbook philosophy Silhouette Simple Stories Sketches with a Twist Sketch Support Spellbinders stamping Stuck?! Sketches Tim Holtz Distress Ink tutorial Twisted Sketches two-page layouts vintage photos We R Memory Keepers

Copyright © 2010-2018 The Constant Scrapper