• Skip to primary navigation
  • Skip to main content
  • Skip to primary sidebar
  • Skip to secondary sidebar
  • Home
  • About me

The Constant Scrapper

If I'm not scrapbooking I'm thinking about scrapbooking!

Christmas

My 1st Christmas: DT layout for Stuck?! Sketches

December 1, 2015 By Janice Daquila-Pardo 1 Comment

My 1st Christmas is a two-photo scrapbook page that uses patterned paper from BasicGrey's Figgy collection and die cuts from Pink Paislee.

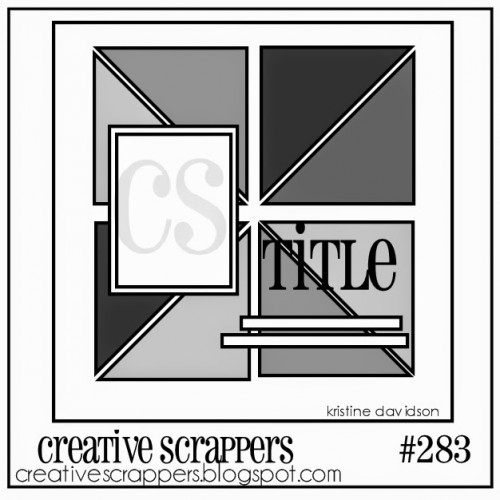
Today Stuck?! Sketches launches our first challenge of December. The sketch is beautiful, and the prizes from May Arts ($25.00 gift certificate) and Evalicious ($20.00 gift certificate) are great. Why not play along with us?

Stuck Sketches December 1 2015

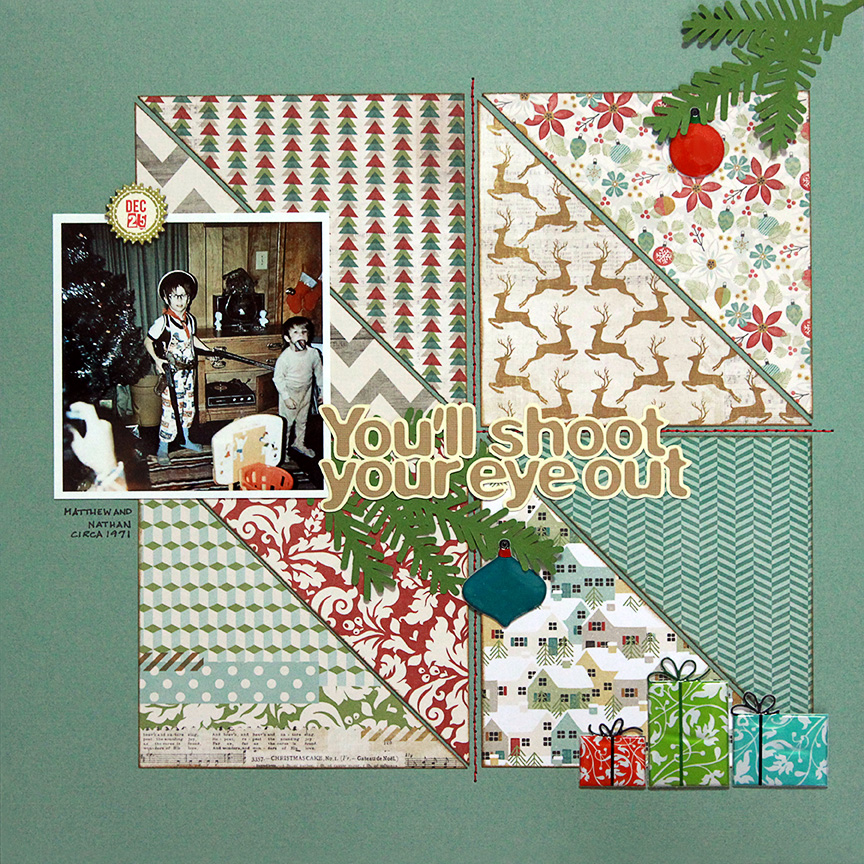
Because I was born on Thanksgiving Day, when Christmas Eve came around I was exactly one month old. These photos were taken at my Nana and Papa’s house (Dad’s side), and I really love that Mom had already made me a stocking that matched hers and Daddy’s that was hanging in readiness for Santa Claus.

Product/technique notes

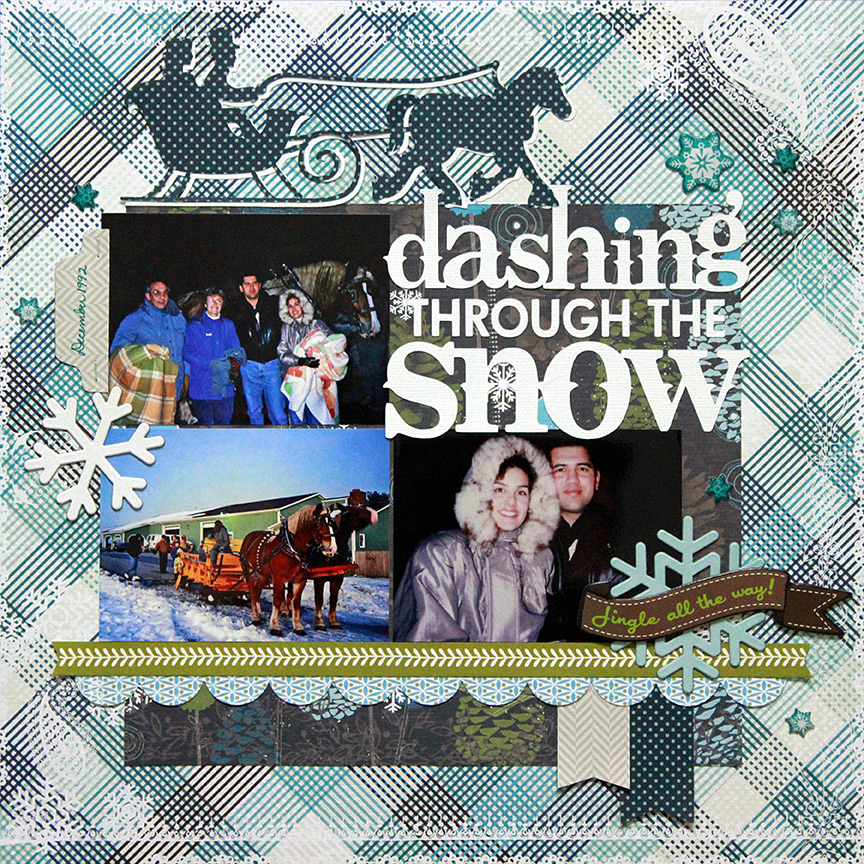
I used patterned papers and stickers from the old BasicGrey Figgy collection because the colors matched so well with these vintage photos. The die cuts are from Pink Paislee’s Snow Village collection.

Note: I’m submitting this to the Paper Issues Owl I Want for Christmas link party.

Filed Under: Layouts based on sketches, My scrapbook layouts Tagged With: 2 photos, Basic Grey, Christmas, one-page layouts, Stuck?! Sketches, vintage photos

Dashing through the snow

December 23, 2014 By Janice Daquila-Pardo 4 Comments

Dashing_Daquila-Pardo

What a fabulous way to celebrate the cold Christmas season—riding in a horse-drawn sleigh to the sound of jingling bells!

I joined my parents and some of their friends in a freezing, spirited evening ride in a two-horse open sleigh back in December 1992. It was such a thrill to be living out the scenes we sing about in Christmas carols. We kept as warm as we could with blankets and laughter, and then ended the evening with steaming mugs of hot chocolate. This is such a magical Christmas memory.

Product/technique notes

I used this nice sketch from Stuck?! Sketches and papers from Little Yellow Bicycle’s “Winter Twig” collection. The title and one-horse open sleigh die cuts are from the Silhouette store. Puffy stickers are from SEI.
StuckSketches12december12014

Filed Under: Layouts based on sketches, My scrapbook layouts Tagged With: 3 photos, Christmas, Little Yellow Bicycle, one-page layouts, Silhouette

Vintage carolers Christmas card

December 20, 2014 By Janice Daquila-Pardo Leave a Comment

VintageCarolersCard_Daquila-Pardo

The images of Christmas carolers from Charles Dickens’ era are so romantic. With this Christmas card I tried to capture that charm.

Product/technique notes

I cut 1/4-inch strips of patterned paper from Crate Paper’s “Bundled Up” collection to create the background for this card. The vintage carolers are a Silhouette cut file. Easy peasy!

Filed Under: Cards Tagged With: cards, Christmas, Crate Paper, Silhouette

Wine bottle tag tutorial

December 13, 2014 By Janice Daquila-Pardo Leave a Comment

TisTheSeasonWineTags1_Daquila-Pardo

We have some Christmas parties to attend this weekend, so I thought I would try my hand at making some wine tags to adorn the bottles we took along. Here’s a tutorial based on what I learned while creating mine.

Tutorial

  1. Cut base paper (I used cardstock, but it would look quite nice with patterned paper as well) to 3 x 10 inches.
  2. Score base paper at 3 inches.
  3. Cut patterned paper to 2.75 x 9.75 inches.
  4. Don’t score the patterned paper yet; you want to wait until it’s lined up properly on the base paper so you know exactly where it needs to be folded. But I do recommend scoring a second time so that your project folds crisply. I’ll tell you when.
  5. Notch the bottom of the patterned paper into a banner shape.
  6. Lay the patterned paper on the base paper and cut the matching notch into the base paper.
  7. Flip the base paper over and find the center of the 3-inch section by lightly drawing an X from corner to corner. This will ensure that you punch your bottle neck opening in the right spot.
  8. At this point, because I use adhesive that isn’t hard to pull up, I adhered the two papers together so that I could punch them at the same time. Then I used a 1.25-inch circle punch to create the bottle neck opening.
  9. Carefully pull up the patterned paper from the base paper and line up a 1.5-inch circle punch around the original hole to create the double ring effect. Glue the two papers back together.
  10. Now put the project back on your scoring board and score again at 3 inches.
  11. Have fun embellishing your wine tags!
TisTheSeasonWineTags2_Daquila-Pardo

Closeup shot of the left tag

TisTheSeasonWineTags3_Daquila-Pardo

Closeup shot of the right tag

Product/technique notes

I created both of these tags using past years’ My Mind’s Eye Christmas collections—”Festive” on the left tag and “Be Merry” on the right one. I loved how they turned out! And I’m entering them in the MME December challenge to make small gifts/stocking stuffers.

Filed Under: Tutorials Tagged With: Christmas, My Mind's Eye, rosette

You’ll shoot your eye out

December 12, 2014 By Janice Daquila-Pardo Leave a Comment

You'llShootYourEyeOut_Daquila-Pardo

Does this photo make you think of Ralphie from “A Christmas Story” (1983)?

Yeah, me too.

Ralphie: I want an official Red Ryder, carbine action, two-hundred shot range model air rifle!
Mrs. Parker: No, you’ll shoot your eye out.

This photo was taken on Christmas morning circa 1971. My husband, at about the age of four, is the one gloriously outfitted in his new cowboy gear from Santa Claus. I really don’t have a clue what his younger brother, Nate, is doing. LOL!

I dare ya not to hear this title in the sing-song voices of the characters from the movie. I double-DOG-dare ya.

Product/technique notes

I followed the Creative Scrappers sketch below for this page because I really liked the idea that my patterned paper areas would look a lot like presents. The papers are from Pink Paislee’s “Snow Village” 6×6 pad. The colors and vintage feel of this line matched so well with that photo! And the puffy stickers are from SEI. I designed the title and cut it on the Cameo, and the pine branches are part of a Silhouette cut file.
Creative Scrappers 283

Filed Under: 12x12 layouts using 6x6 paper, My scrapbook layouts, Sketches Tagged With: 1 photo, Christmas, hand stitching, one-page layouts, Silhouette, vintage photos

« Previous Page
Next Page »

Primary Sidebar

Thanks for visiting!

Hi, I'm Janice.

Follow me

Follow on Bloglovin

My sketches on Pinterest

Design team

I am a proud Stuck?! Sketches designer!

Past design teams

Scrap & Music sketch designer

Creative Scrappers sketch designer

Sketches With a Twist sketch designer

Sketchabilities design team

Twisted Sketches design team

Secondary Sidebar

Topic categories

  • 12×12 layouts using 6×6 paper
  • Cards
  • Freebies/giveaways
  • Layouts based on sketches
  • Layouts using 3×4 journaling cards
  • My scrapbook layouts
  • Reviews
  • Scrapbook products
  • Sketches
    • My sketches
  • That redo that you do
  • Tips
  • Tutorials
  • Uncategorized

Archives

Tags

1 photo 2 photos 3 photos 4 photos American Crafts banner Basic Grey Bella Blvd Blogtoberfest border punches cards Christmas Copic coloring Crate Paper Creative Scrappers Echo Park emotional journaling Fancy Pants Halloween hand stitching Jillibean Soup Little Yellow Bicycle Making Memories Martha Stewart Crafts My Mind's Eye October Afternoon one-page layouts Pebbles Pink Paislee rosette Scrap & Music sketches scrapbook philosophy Silhouette Simple Stories Sketches with a Twist Sketch Support Spellbinders stamping Stuck?! Sketches Tim Holtz Distress Ink tutorial Twisted Sketches two-page layouts vintage photos We R Memory Keepers

Copyright © 2010-2018 The Constant Scrapper