• Skip to primary navigation
  • Skip to main content
  • Skip to primary sidebar
  • Skip to secondary sidebar
  • Home
  • About me

The Constant Scrapper

If I'm not scrapbooking I'm thinking about scrapbooking!

rosette

Blogtoberfest Day 6

October 6, 2011 By Janice Daquila-Pardo Leave a Comment

Celebrate Blogtoberfest with me all month!

Happy birthday, Daddy

Today is the 78th anniversary of my dear father’s birth. We all miss him so. But today I want to celebrate his birth with a layout that uses a photo from his 65th birthday dinner in 1998.

At that time we were all living in Chapel Hill, NC, so we were able to celebrate together with dinner and cake at a nice local restaurant. We had a lovely time together, and then the waiter took this photo for us. Isn’t it amazing how sometimes that one shot you have taken by a stranger can become so important to you later? This is definitely one of those times.

65_Daquila-Pardo

Happy birthday dear Daddy. Happy birthday to you!

Happy National German-American Day

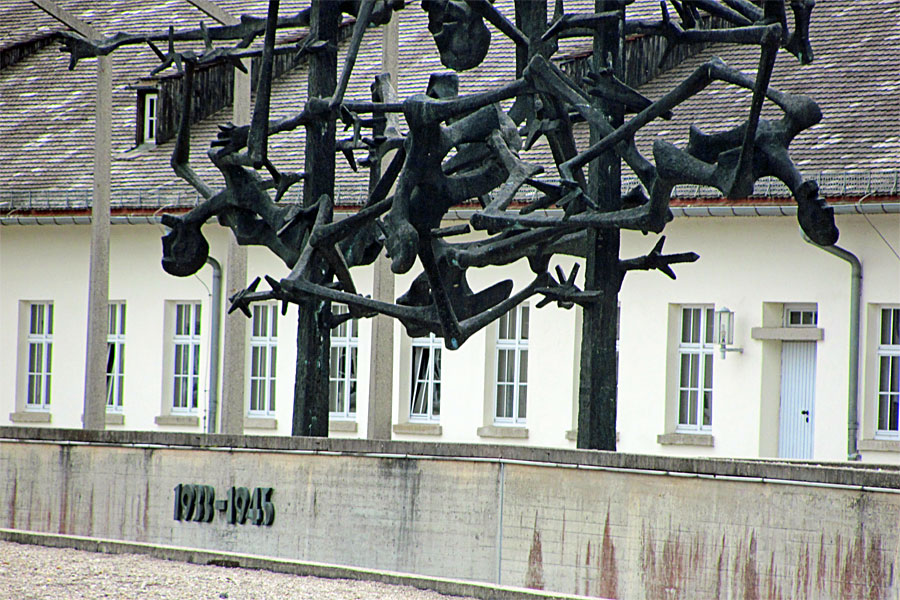
Today is also National German-American Day. My sweet mother is German-American, and it just so happens that she traveled to Germany for the first time last month! So I am posting a few photos from her wonderful trip as a way of celebrating this day. I will certainly do a layout to commemorate her trip soon and post it here, but I wanted to share a few photos of the old country to mark the day. “Ich liebe dich, Mama!”

DaquilaGermany1

Beautiful German countryside

DaquilaGermany2

DaquilaGermany3

DaquilaGermany4

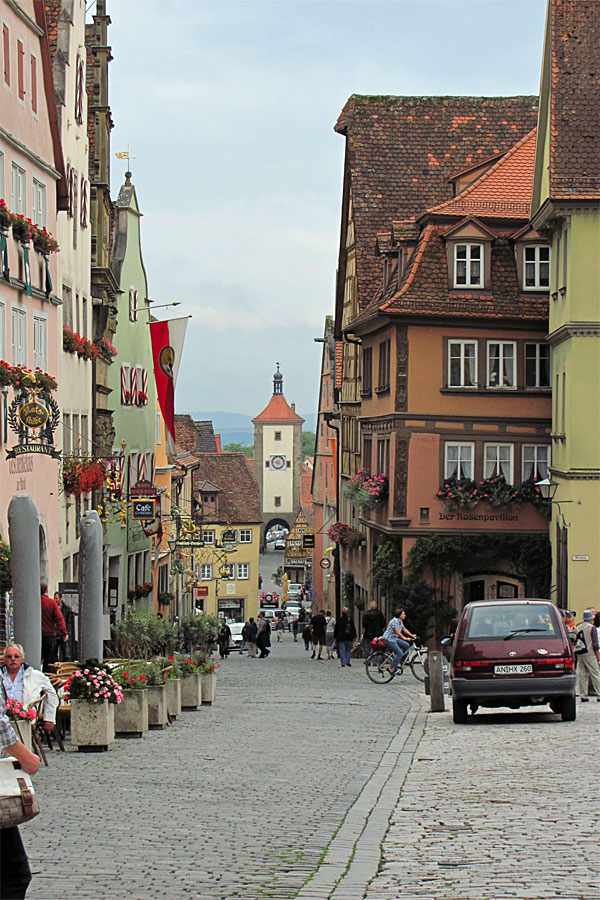
This photo makes me want to climb inside!

DaquilaGermany5

Filed Under: 12x12 layouts using 6x6 paper, My scrapbook layouts Tagged With: 1 photo, banner, Blogtoberfest, Cosmo Cricket, one-page layouts, rosette, Silhouette, stamping

Bicentennial

July 6, 2011 By Janice Daquila-Pardo Leave a Comment

Twisted Sketches has revealed its latest sketch, #109, and the twist is “flowers.” Be sure to head over to the site to grab the sketch, then create something and link it up! 🙂

Here’s my Design Team layout inspired by the sketch…

Bicentennial_Daquila-Pardo

July 4, 1976 was a huge day of celebration for our country and for the Daquila family.

Because I was working on this layout over the July 4th weekend, I was inspired to scrap these 1976 Bicentennial photos. On July 4th, 1976, our whole family donned red, white and blue outfits that Mom had carefully chosen for us and jumped on a plane from Cleveland to California (where my mom’s side of the family lived). It was the first time Phil and I had taken an airplane trip, and that alone was very exciting. But at school and at home we had been learning all about what the Bicentennial meant to our country, and so that celebration was also a big deal to us.

Once we arrived in California we spent that day catching up with our grandparents and our mom’s brother and his family (that’s our cousin, Lori, in the photos with us). We had a picnic and then ended the day writing our names in the dark with sparklers. It was a really big day.

The patterned papers I used are mostly from K&Company’s Americana line, and the background paper is from Basic Grey’s Basics line.

Filed Under: Layouts based on sketches, My scrapbook layouts, Sketches Tagged With: 2 photos, border punches, one-page layouts, rosette, Silhouette, Twisted Sketches, vintage photos

Celebrating mother, maman, mommy, amma, mama

May 8, 2011 By Janice Daquila-Pardo 2 Comments

Happy Mother’s Day!

The Twisted Sketches blog is celebrating the achievement of its 100th sketch today, and so the whole design team has done layouts about the concept of “celebration.” I could think of nothing more deserving of celebration today than my mother.

This layout is dedicated to all those little idiosyncrasies that make a loved one even more dear to us. Just a few (I don’t want to make her too uncomfortable when she reads this!) of my mom’s quirks include:

  • very animated story telling (see the photos below)
  • acting as if she didn’t hear what you said so she can repeat your words back to you, twisted into something funny
  • believing it’s wasteful of time to be early to anything
  • loving when family members poke fun at her and urging them to do it more

I love you Mom! And I wish we could be together today.

CherishHerQuirks_Daquila-Pardo

Happy Mother's Day, Mom!

Here is sketch #100, on which my layout was based. But I urge you to go to the Twisted Sketches site to play along this week because there’s a $25 prize up for grabs!

6a00d83451d2c069e20154322dbd0c970c-800wi

This is sketch #100 from www.twistedsketches.com

And now are you game for a tiny bit of education about the word “mama?” I found a short article that explains why sounds close to “mama” appear in so many languages (link removed due to site having been hacked) and thought you might enjoy it.

I hope you have a wonderful day!

Filed Under: Layouts based on sketches, My scrapbook layouts Tagged With: 3 photos, banner, one-page layouts, rosette, Silhouette, Twisted Sketches

Making a Christmas banner: Fa la la la la!

December 6, 2010 By Janice Daquila-Pardo Leave a Comment

I really like to follow scrapbook trends. But I don’t always try each one because either it doesn’t fit my style or I don’t want to buy the needed supplies just to try it. But banners are a craze that I have been able to get into.

There are so many times when a banner is the perfect way to add a celebratory feel to the occasion or scrapbook page. And there are a million ways to make your banner unique.

I just completed a Christmas banner this weekend to grace our fireplace mantel. I’m including details about how I made this in case you’d like to make a banner for your house but don’t want to take time figuring out the measurements, etc. First is the finished banner:

Fa la la la la Christmas banner

The finished product: My Christmas banner

And here’s how it came together:

  • Choose two 12×12 sheets of two patterned papers (the Christmas trees are by The Paper Studio, and the distressed polka dots are by My Mind’s Eye).
  • Pull two colors of 8.5×11 cardstock for the letters.
  • Select two coordinating colors of ribbon.
  • Grab your dry adhesive as well as your hot glue gun.
  • Die cut the individual flags of the banner using the two largest dies in the Spellbinders Labels 8 set.
I cut out the flags of the banner using the two largest dies in the Spellbinders Labels 8 set and my Cuttlebug.

I cut out the flags of the banner using the two largest dies in the Spellbinders Labels 8 set and my Cuttlebug.

  • Cut out the letters to spell your chosen message. I set up my words in my Silhouette software and cut the pale blue for the letter and the green for the offset. I used the Arial Rounded font.
I cut out the letters for my version using my Silhouette

I cut out the letters for my version using my Silhouette.

  • Assemble the two layers of the lettering.
  • Assemble the two layers of each flag.
  • Center and adhere the appropriate letter to each flag to spell your word.
  • Use a hole punch in both corners of each flag, lining up subsequent flags to the first for consistent placement.
  • Lay out the banner as you want it to hang (in the correct order) on your work table.
  • Plug in your glue gun to start it heating up.
  • Cut ribbon into 12-inch lengths for each hole. I used 11-inch lengths and think it would have been easier to tie into bows with a little more. I also alternated the two colors so that every other tie was the other color. Tie each flag to the next one.
  • String a length of ribbon through the first and last holes to create hangers. Because I had already decided that I would be adding a rosette to the ties (which would cover my adhesive), I used a hot glue gun to attach the two ends of the ribbon to form a loop.
  • Create two rosettes, one for each end’s tie. For each:
    • Cut a 1.25×11-inch piece of cardstock and accordion fold it.
    • Glue one end of one strip to its other end to form a loop.
    • Punch a 1.5-inch circle out of a spare bit of cardstock and place it on your worktable. Put a good dose of hot glue all over the circle and immediately but gently “close” the accordion onto the hot glue. Hold your rosette in place until the glue dries.
    • Die cut or punch coordinating toppers for your rosette and use the hot glue to adhere them.
  • Adhere the rosettes to the ties of the banner. For each, punch another 1.5-inch circle out of cardstock. Slather it with hot glue, then quickly place it behind the spot on the tie where you attached the two ends earlier. Place the finished rosette right above the sticky circle and create a sandwich around the ribbon.
Create a rosette with leftover supplies to finish off the ends of the banner.

Create a rosette with leftover supplies to finish off the ends of the banner.

  • Hang your artwork for all to see!

If you played along and created a banner following these steps (even if loosely) please let me know in the comments. I would love to see what you made. And if my directions leave you with questions, post those in comments as well. I’ll try to clear things up for you.

Filed Under: Tutorials Tagged With: banner, Christmas, rosette, Silhouette, Spellbinders, trend, tutorial

« Previous Page

Primary Sidebar

Thanks for visiting!

Hi, I'm Janice.

Follow me

Follow on Bloglovin

My sketches on Pinterest

Design team

I am a proud Stuck?! Sketches designer!

Past design teams

Scrap & Music sketch designer

Creative Scrappers sketch designer

Sketches With a Twist sketch designer

Sketchabilities design team

Twisted Sketches design team

Secondary Sidebar

Topic categories

  • 12×12 layouts using 6×6 paper
  • Cards
  • Freebies/giveaways
  • Layouts based on sketches
  • Layouts using 3×4 journaling cards
  • My scrapbook layouts
  • Reviews
  • Scrapbook products
  • Sketches
    • My sketches
  • That redo that you do
  • Tips
  • Tutorials
  • Uncategorized

Archives

Tags

1 photo 2 photos 3 photos 4 photos American Crafts banner Basic Grey Bella Blvd Blogtoberfest border punches cards Christmas Copic coloring Crate Paper Creative Scrappers Echo Park emotional journaling Fancy Pants Halloween hand stitching Jillibean Soup Little Yellow Bicycle Making Memories Martha Stewart Crafts My Mind's Eye October Afternoon one-page layouts Pebbles Pink Paislee rosette Scrap & Music sketches scrapbook philosophy Silhouette Simple Stories Sketches with a Twist Sketch Support Spellbinders stamping Stuck?! Sketches Tim Holtz Distress Ink tutorial Twisted Sketches two-page layouts vintage photos We R Memory Keepers

Copyright © 2010-2018 The Constant Scrapper