• Skip to primary navigation
  • Skip to main content
  • Skip to primary sidebar
  • Skip to secondary sidebar
  • Home
  • About me

The Constant Scrapper

If I'm not scrapbooking I'm thinking about scrapbooking!

Spellbinders

Six ways to combat a common crafting conundrum: How do you fight the post-holiday blahs?

July 7, 2011 By Janice Daquila-Pardo 2 Comments

Are you like me? When a holiday is just around the corner, you feel like buying the newest seasonal products and scrapping your heart out? Note that this means we get the desire to scrap memories before they’ve actually been made. 😛 But once we’ve celebrated the holiday we feel less like working with those products, right?

Harumph!

I do believe it’s the scrapbook companies’ fault! 😉 I mean, they put untold effort into promoting seasonal products before the holiday—by showing off gorgeous design-team examples, hosting giveaways and blasting us with contests. And we fall in line and get completely carried away by the excitement of it all.

Yet once the holiday has come and gone and we’re armed with the photos and memories from the event, we’re also experiencing the post-holiday blahs…and we’ve sort of lost that lovin’ feeling. Not to mention the fact that the online world has now moved on…usually to focus on the next holiday!

So, what are we crafters to do? Well, I’ve put together a list of six ways to combat this common craft conundrum (say that as fast as you can):

Things to do before the holiday

  1. Scrap past years’ photos. Most of us have at least a few photos from past holidays. Harness your pre-holiday mojo by getting out those older photos and pairing them with your new products.
  2. Make holiday-themed home decor items. If you make decorations for your home with just-released hoiday products you’ll satisfy the itch to create as well as get to display them right away.
  3. Create premade pages. While you’re feeling motivated (before the big day), make pages that are complete except for the photos. That way you can choose and print the needed number of photos right after the holiday, pop them on the page and add the journaling. Done and done!

Strategies to try after the holiday

  1. Put yourself back in the mood. Media has a strong effect on our moods, so why not use it? Fire up “Elf” or “It’s a Wonderful Life” if you want to work on Christmas photos. Put on “Independence Day” or listen to some John Philip Sousa if you want to get into the patriotic mood again. Then craft the night away!
  2. Get a holiday crafting buddy. In the weeks leading up to the holiday when you’re really excited about all the seasonal hoopla, make an appointment on your calendar to crop with some friends, and then scrap those photos. Make this appointment for as soon after the holiday as possible. Get your crafting buddies to agree to a theme-specific crop. You can all agree that you will only work on holiday projects so that you can keep each other motivated.
  3. Host a holiday scrap night for one. Even if you’re just going to scrap at home, make an appointment on your calendar to do it. Make this appointment for as soon after the holiday as possible. Pull out all your special products and put them in a prominent spot in your crafting space to keep you fired up. And then keep that appointment. If you’ve planned ahead for it, you are more likely to look forward to it and be in the right mood when the time comes.

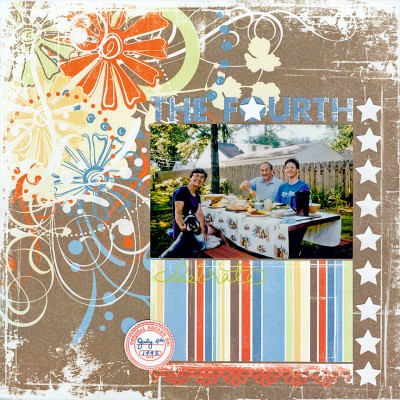
Yes, I took a little of my own advice. A few weeks ago I rode the patriotic wave and pulled out this July 4th photo from 1992. Then I put together the layout below, following tip #1 under the before-holiday list above. I had fun doing it because I wasn’t yet blah about red, white and blue.

TheFourth_Daquila-Pardo

This is just a simple layout about my family celebrating the 4th of July together in 1992.

If you have any other strategies for dealing with the problem of fading crafty enthusiasm after a holiday, please share it in the comments. I would love to add to this list.

And to the scrapbooking companies out there, would it kill you to give us a little bit of post-holiday inspirado?
Filed Under: My scrapbook layouts, Tips Tagged With: 1 photo, border punches, one-page layouts, Recollections, Silhouette, Spellbinders, stamping, Technique Tuesday, vintage photos, We R Memory Keepers

PageMaps’ My Little Shoebox sketch contest

June 13, 2011 By Janice Daquila-Pardo 4 Comments

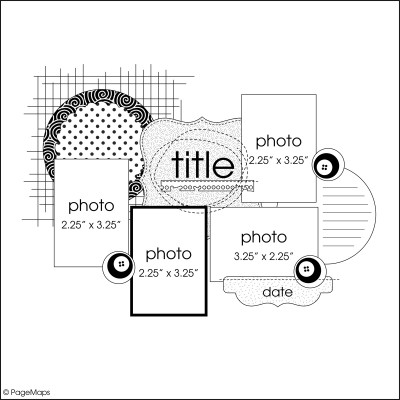
Every once in a while I run across a sketch that really makes me yearn to pull together some photos and products and get scrapping. This PageMaps sketch had that effect on me when I saw it on their blog. It’s their June contest sketch, and I knew I wanted to play along.

jun1112x12e

PageMaps June 2011 sketch for contest

A few of the reasons I like this sketch so much and can see using it again are that it features four photos (so you can really tell a story with them), calls for a few nice pops of patterned paper and still leaves a good amount of white space for the eyes to rest a bit while looking at it. It accomplishes a lot in a 12×12 canvas!

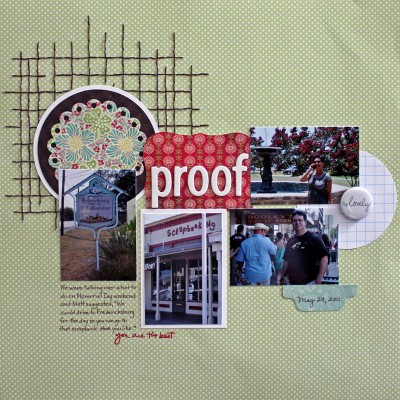
This is the layout I created based on the sketch. The photos are from Memorial Day weekend, just a few weeks ago. When Matt and I started talking about the kinds of things we could do during the holiday weekend, Matt suggested, “We could drive to Fredericksburg for the day so you can go to that scrapbook store you like.”

Proof_Daquila-Pardo

Here is my entry for the PageMaps June 2011 sketch contest.

Now if that’s not proof of love, I don’t know what is. 🙂

Filed Under: 12x12 layouts using 6x6 paper, Layouts based on sketches, My scrapbook layouts, Sketches Tagged With: 4 photos, American Crafts, Basic Grey, Echo Park, Making Memories, My Mind's Eye, one-page layouts, Spellbinders, Technique Tuesday, The Paper Studio

Spanning a score of years

April 19, 2011 By Janice Daquila-Pardo Leave a Comment

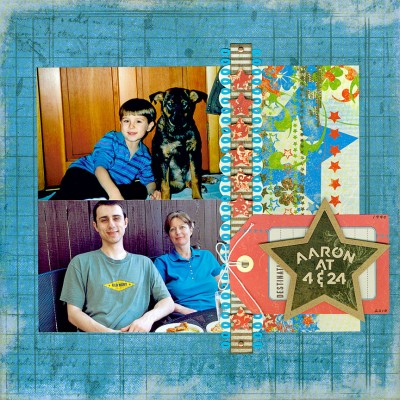
I really appreciate the layouts I see that compare people at different times in their life. So I pulled out two photos of Matt’s nephew, Aaron, at the ages of 4 and 24 and got to work on a layout to compare them.

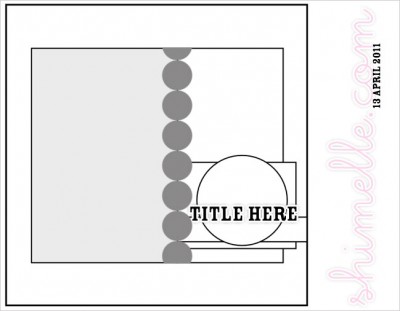
The hardest part about this layout for me was finding products that would work well for both times in a boy’s life. But once I did, the sketch I found on shimelle.com helped it all come together. Following is the resulting layout as well as the sketch.

Aaron4&24_JDaquila-Pardo

Aaron at 4 & 24: A boy grows into a man

The sketch calls for one large or two smaller photos and lots of attention on the border.

Filed Under: Layouts based on sketches, My scrapbook layouts Tagged With: 2 photos, border punches, one-page layouts, Spellbinders, vintage photos

How to use a movie poster as scrapbook inspiration

February 21, 2011 By Janice Daquila-Pardo Leave a Comment

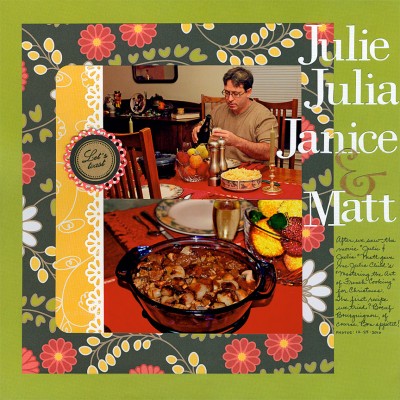
After seeing the movie “Julie & Julia” in 2009—which intertwines the story of Julia Child’s start in the cooking profession with blogger Julie Powell’s challenge to cook all the recipes in Child’s first book—I received Julia Child’s “Mastering the Art of French Cooking” for Christmas. There’s a scene in the movie where Julie Powell has to cook dinner for a special guest and chooses to make Boeuf Bourguignon. Matt and I decided that would be the first dish we would try.

Let me tell you, you don’t just make Boeuf Bourguignon one day after work. This recipe takes several hours and requires some special ingredients that most of us don’t normally keep in our pantries. In our house when we undertake a project like that, we take photos.

My process

Julie & Julia movie posterWhen I was ready to scrap these photos I already knew what I wanted to title my layout. So I decided to look to the movie art for inspiration. First I looked up “Julie & Julia” on IMDB and thought the title treatment on the movie poster was something I could work with. I could cut out the title with my Silhouette, but what were those fonts?
So I searched on “what fonts are used on julie & julia poster?” and the most helpful result I found was on FontFeed. This site identified the two fonts used as Didot for the words Julie/Julia and Bernhard Modern for the ampersand. The problem was that I didn’t have either of those fonts, and I couldn’t find them on any free font sites.

Then I did another search for “fonts similar to Didot” and found identifont.com, where you can find lists of fonts that are similar to the one you’re looking for. Following this site’s recommendations I found replacement fonts within those that I already owned and I was able to go to town setting up my cut files in the Silhouette Studio software.

I decided to base my color scheme on the movie poster as well. Black and green factor heavily in what makes this poster pop, so I tried to use those colors. I found the perfect paper in my stash that combined the black and green from the poster as well as the red and gold in my photos. From all that came this layout. Bon appetit!

Julie&Julia3_JDaquila-Pardo

Filed Under: My scrapbook layouts, Tips, Tutorials Tagged With: 2 photos, American Crafts, border punches, Martha Stewart Crafts, one-page layouts, scrapbook tips, Silhouette, Spellbinders, stamping

Making a Christmas banner: Fa la la la la!

December 6, 2010 By Janice Daquila-Pardo Leave a Comment

I really like to follow scrapbook trends. But I don’t always try each one because either it doesn’t fit my style or I don’t want to buy the needed supplies just to try it. But banners are a craze that I have been able to get into.

There are so many times when a banner is the perfect way to add a celebratory feel to the occasion or scrapbook page. And there are a million ways to make your banner unique.

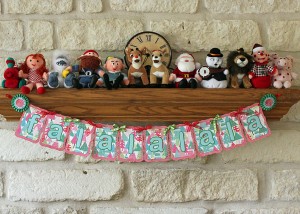
I just completed a Christmas banner this weekend to grace our fireplace mantel. I’m including details about how I made this in case you’d like to make a banner for your house but don’t want to take time figuring out the measurements, etc. First is the finished banner:

Fa la la la la Christmas banner

The finished product: My Christmas banner

And here’s how it came together:

  • Choose two 12×12 sheets of two patterned papers (the Christmas trees are by The Paper Studio, and the distressed polka dots are by My Mind’s Eye).
  • Pull two colors of 8.5×11 cardstock for the letters.
  • Select two coordinating colors of ribbon.
  • Grab your dry adhesive as well as your hot glue gun.
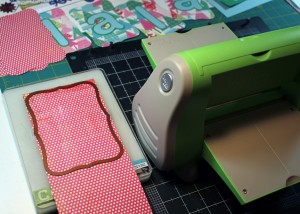
  • Die cut the individual flags of the banner using the two largest dies in the Spellbinders Labels 8 set.
I cut out the flags of the banner using the two largest dies in the Spellbinders Labels 8 set and my Cuttlebug.

I cut out the flags of the banner using the two largest dies in the Spellbinders Labels 8 set and my Cuttlebug.

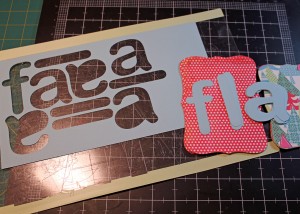
  • Cut out the letters to spell your chosen message. I set up my words in my Silhouette software and cut the pale blue for the letter and the green for the offset. I used the Arial Rounded font.
I cut out the letters for my version using my Silhouette

I cut out the letters for my version using my Silhouette.

  • Assemble the two layers of the lettering.
  • Assemble the two layers of each flag.
  • Center and adhere the appropriate letter to each flag to spell your word.
  • Use a hole punch in both corners of each flag, lining up subsequent flags to the first for consistent placement.
  • Lay out the banner as you want it to hang (in the correct order) on your work table.
  • Plug in your glue gun to start it heating up.
  • Cut ribbon into 12-inch lengths for each hole. I used 11-inch lengths and think it would have been easier to tie into bows with a little more. I also alternated the two colors so that every other tie was the other color. Tie each flag to the next one.
  • String a length of ribbon through the first and last holes to create hangers. Because I had already decided that I would be adding a rosette to the ties (which would cover my adhesive), I used a hot glue gun to attach the two ends of the ribbon to form a loop.
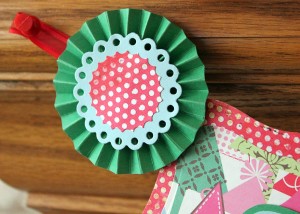
  • Create two rosettes, one for each end’s tie. For each:
    • Cut a 1.25×11-inch piece of cardstock and accordion fold it.
    • Glue one end of one strip to its other end to form a loop.
    • Punch a 1.5-inch circle out of a spare bit of cardstock and place it on your worktable. Put a good dose of hot glue all over the circle and immediately but gently “close” the accordion onto the hot glue. Hold your rosette in place until the glue dries.
    • Die cut or punch coordinating toppers for your rosette and use the hot glue to adhere them.
  • Adhere the rosettes to the ties of the banner. For each, punch another 1.5-inch circle out of cardstock. Slather it with hot glue, then quickly place it behind the spot on the tie where you attached the two ends earlier. Place the finished rosette right above the sticky circle and create a sandwich around the ribbon.
Create a rosette with leftover supplies to finish off the ends of the banner.

Create a rosette with leftover supplies to finish off the ends of the banner.

  • Hang your artwork for all to see!

If you played along and created a banner following these steps (even if loosely) please let me know in the comments. I would love to see what you made. And if my directions leave you with questions, post those in comments as well. I’ll try to clear things up for you.

Filed Under: Tutorials Tagged With: banner, Christmas, rosette, Silhouette, Spellbinders, trend, tutorial

« Previous Page
Next Page »

Primary Sidebar

Thanks for visiting!

Hi, I'm Janice.

Follow me

Follow on Bloglovin

My sketches on Pinterest

Design team

I am a proud Stuck?! Sketches designer!

Past design teams

Scrap & Music sketch designer

Creative Scrappers sketch designer

Sketches With a Twist sketch designer

Sketchabilities design team

Twisted Sketches design team

Secondary Sidebar

Topic categories

  • 12×12 layouts using 6×6 paper
  • Cards
  • Freebies/giveaways
  • Layouts based on sketches
  • Layouts using 3×4 journaling cards
  • My scrapbook layouts
  • Reviews
  • Scrapbook products
  • Sketches
    • My sketches
  • That redo that you do
  • Tips
  • Tutorials
  • Uncategorized

Archives

Tags

1 photo 2 photos 3 photos 4 photos American Crafts banner Basic Grey Bella Blvd Blogtoberfest border punches cards Christmas Copic coloring Crate Paper Creative Scrappers Echo Park emotional journaling Fancy Pants Halloween hand stitching Jillibean Soup Little Yellow Bicycle Making Memories Martha Stewart Crafts My Mind's Eye October Afternoon one-page layouts Pebbles Pink Paislee rosette Scrap & Music sketches scrapbook philosophy Silhouette Simple Stories Sketches with a Twist Sketch Support Spellbinders stamping Stuck?! Sketches Tim Holtz Distress Ink tutorial Twisted Sketches two-page layouts vintage photos We R Memory Keepers

Copyright © 2010-2018 The Constant Scrapper