I really like to follow scrapbook trends. But I don’t always try each one because either it doesn’t fit my style or I don’t want to buy the needed supplies just to try it. But banners are a craze that I have been able to get into.
There are so many times when a banner is the perfect way to add a celebratory feel to the occasion or scrapbook page. And there are a million ways to make your banner unique.
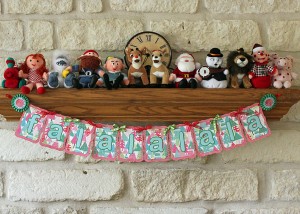
I just completed a Christmas banner this weekend to grace our fireplace mantel. I’m including details about how I made this in case you’d like to make a banner for your house but don’t want to take time figuring out the measurements, etc. First is the finished banner:
And here’s how it came together:
- Choose two 12×12 sheets of two patterned papers (the Christmas trees are by The Paper Studio, and the distressed polka dots are by My Mind’s Eye).
- Pull two colors of 8.5×11 cardstock for the letters.
- Select two coordinating colors of ribbon.
- Grab your dry adhesive as well as your hot glue gun.
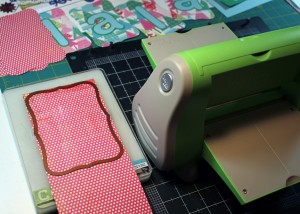
- Die cut the individual flags of the banner using the two largest dies in the Spellbinders Labels 8 set.

I cut out the flags of the banner using the two largest dies in the Spellbinders Labels 8 set and my Cuttlebug.
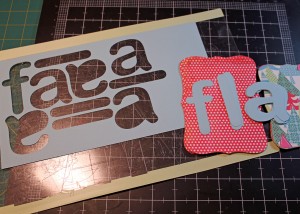
- Cut out the letters to spell your chosen message. I set up my words in my Silhouette software and cut the pale blue for the letter and the green for the offset. I used the Arial Rounded font.
- Assemble the two layers of the lettering.
- Assemble the two layers of each flag.
- Center and adhere the appropriate letter to each flag to spell your word.
- Use a hole punch in both corners of each flag, lining up subsequent flags to the first for consistent placement.
- Lay out the banner as you want it to hang (in the correct order) on your work table.
- Plug in your glue gun to start it heating up.
- Cut ribbon into 12-inch lengths for each hole. I used 11-inch lengths and think it would have been easier to tie into bows with a little more. I also alternated the two colors so that every other tie was the other color. Tie each flag to the next one.
- String a length of ribbon through the first and last holes to create hangers. Because I had already decided that I would be adding a rosette to the ties (which would cover my adhesive), I used a hot glue gun to attach the two ends of the ribbon to form a loop.
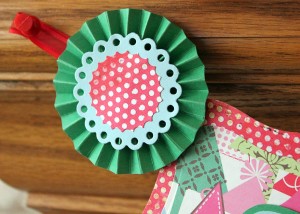
- Create two rosettes, one for each end’s tie. For each:
- Cut a 1.25×11-inch piece of cardstock and accordion fold it.
- Glue one end of one strip to its other end to form a loop.
- Punch a 1.5-inch circle out of a spare bit of cardstock and place it on your worktable. Put a good dose of hot glue all over the circle and immediately but gently “close” the accordion onto the hot glue. Hold your rosette in place until the glue dries.
- Die cut or punch coordinating toppers for your rosette and use the hot glue to adhere them.
- Adhere the rosettes to the ties of the banner. For each, punch another 1.5-inch circle out of cardstock. Slather it with hot glue, then quickly place it behind the spot on the tie where you attached the two ends earlier. Place the finished rosette right above the sticky circle and create a sandwich around the ribbon.
- Hang your artwork for all to see!
If you played along and created a banner following these steps (even if loosely) please let me know in the comments. I would love to see what you made. And if my directions leave you with questions, post those in comments as well. I’ll try to clear things up for you.


