• Skip to primary navigation
  • Skip to main content
  • Skip to primary sidebar
  • Skip to secondary sidebar
  • Home
  • About me

The Constant Scrapper

If I'm not scrapbooking I'm thinking about scrapbooking!

tutorial

How can you resist?

April 27, 2011 By Janice Daquila-Pardo 7 Comments

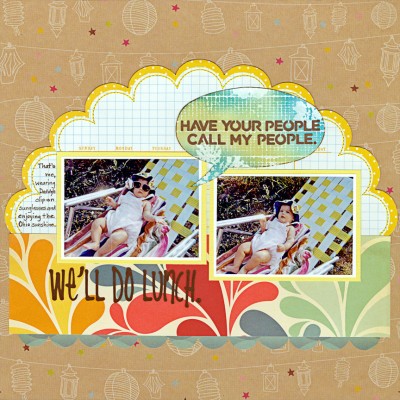
Twisted Sketches launches its 98th sketch today, and the twist this time is “paint.” The sketch and the design team’s interpretations are awaiting you at Twisted Sketches’ site…and here is my design team contribution using the new sketch:

We'llDoLunch_Daquila-Pardo

That's me, wearing Daddy's clip-on sunglasses and enjoying the Ohio sunshine.

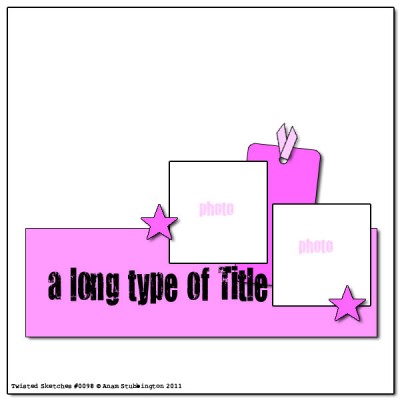
This is the sketch:

6a00d83451d2c069e20147e3cc26c9970b-800wi

Twisted Sketch #98 calls for 2 photos

For the “paint” twist I was inspired to try a resist technique on the talk bubble using white shimmer paint. I have done resist techniques with ink and embossing powder before but had not yet tried paint resist, so I thought I would show a quick step-by-step just in case it might inspire you to try it on a future layout.

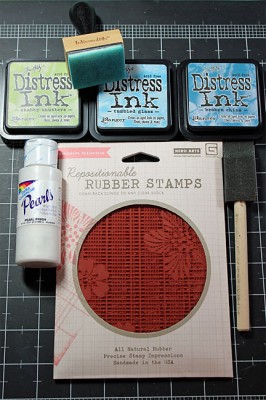
  1. Gather your supplies: Acrylic paint, rubber stamp, Distress Inks and foam applicators.

    PaintResistSupplies

    This technique doesn't take much in the way of supplies.

  2. Apply paint (shimmer paint in my example) to the stamp image and stamp it carefully (don’t smear it) on a spare bit of cardstock.
  3. Immediately take your rubber stamp to a sink and clean it well with soap and water. It’s best not to let the acrylic paint dry on the stamp as it may be harder to remove.
  4. If you’re patient wait until the paint thoroughly dries. If not, hit it with your heat tool for a minute or two.
  5. Start applying the Distress Inks with a circular motion and blend your colors a little where they meet. I used the three colors shown in the photo, but of course there are no rules about how many you use.
  6. Slightly mist a paper towel with water and gently buff off the extra ink from the painted areas to reveal the true color!

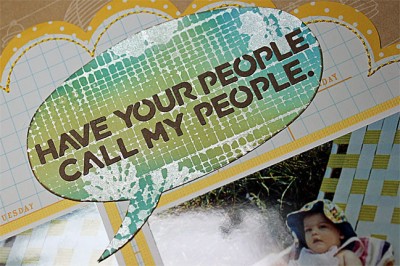
Here is a close-up of the final effect. I think I like it!

CloseUp

This close-up photo shows how the shimmer paint resisted the inks.

If you decide to try this quick technique after reading my post, have your people call my people please leave a comment and a link so I can see what you’ve done!
Filed Under: Layouts based on sketches, My scrapbook layouts, Sketches, Tutorials Tagged With: 2 photos, American Crafts, Basic Grey, Blogging for Scrapbookers class, border punches, October Afternoon, one-page layouts, Silhouette, stamping, tutorial, Twisted Sketches, vintage photos

Making a Christmas banner: Fa la la la la!

December 6, 2010 By Janice Daquila-Pardo Leave a Comment

I really like to follow scrapbook trends. But I don’t always try each one because either it doesn’t fit my style or I don’t want to buy the needed supplies just to try it. But banners are a craze that I have been able to get into.

There are so many times when a banner is the perfect way to add a celebratory feel to the occasion or scrapbook page. And there are a million ways to make your banner unique.

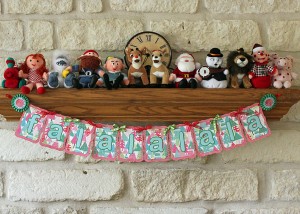
I just completed a Christmas banner this weekend to grace our fireplace mantel. I’m including details about how I made this in case you’d like to make a banner for your house but don’t want to take time figuring out the measurements, etc. First is the finished banner:

Fa la la la la Christmas banner

The finished product: My Christmas banner

And here’s how it came together:

  • Choose two 12×12 sheets of two patterned papers (the Christmas trees are by The Paper Studio, and the distressed polka dots are by My Mind’s Eye).
  • Pull two colors of 8.5×11 cardstock for the letters.
  • Select two coordinating colors of ribbon.
  • Grab your dry adhesive as well as your hot glue gun.
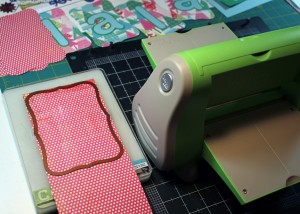
  • Die cut the individual flags of the banner using the two largest dies in the Spellbinders Labels 8 set.
I cut out the flags of the banner using the two largest dies in the Spellbinders Labels 8 set and my Cuttlebug.

I cut out the flags of the banner using the two largest dies in the Spellbinders Labels 8 set and my Cuttlebug.

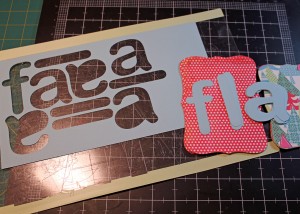
  • Cut out the letters to spell your chosen message. I set up my words in my Silhouette software and cut the pale blue for the letter and the green for the offset. I used the Arial Rounded font.
I cut out the letters for my version using my Silhouette

I cut out the letters for my version using my Silhouette.

  • Assemble the two layers of the lettering.
  • Assemble the two layers of each flag.
  • Center and adhere the appropriate letter to each flag to spell your word.
  • Use a hole punch in both corners of each flag, lining up subsequent flags to the first for consistent placement.
  • Lay out the banner as you want it to hang (in the correct order) on your work table.
  • Plug in your glue gun to start it heating up.
  • Cut ribbon into 12-inch lengths for each hole. I used 11-inch lengths and think it would have been easier to tie into bows with a little more. I also alternated the two colors so that every other tie was the other color. Tie each flag to the next one.
  • String a length of ribbon through the first and last holes to create hangers. Because I had already decided that I would be adding a rosette to the ties (which would cover my adhesive), I used a hot glue gun to attach the two ends of the ribbon to form a loop.
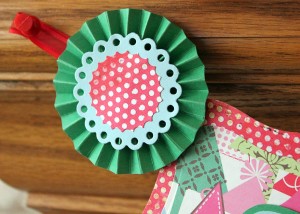
  • Create two rosettes, one for each end’s tie. For each:
    • Cut a 1.25×11-inch piece of cardstock and accordion fold it.
    • Glue one end of one strip to its other end to form a loop.
    • Punch a 1.5-inch circle out of a spare bit of cardstock and place it on your worktable. Put a good dose of hot glue all over the circle and immediately but gently “close” the accordion onto the hot glue. Hold your rosette in place until the glue dries.
    • Die cut or punch coordinating toppers for your rosette and use the hot glue to adhere them.
  • Adhere the rosettes to the ties of the banner. For each, punch another 1.5-inch circle out of cardstock. Slather it with hot glue, then quickly place it behind the spot on the tie where you attached the two ends earlier. Place the finished rosette right above the sticky circle and create a sandwich around the ribbon.
Create a rosette with leftover supplies to finish off the ends of the banner.

Create a rosette with leftover supplies to finish off the ends of the banner.

  • Hang your artwork for all to see!

If you played along and created a banner following these steps (even if loosely) please let me know in the comments. I would love to see what you made. And if my directions leave you with questions, post those in comments as well. I’ll try to clear things up for you.

Filed Under: Tutorials Tagged With: banner, Christmas, rosette, Silhouette, Spellbinders, trend, tutorial

It’s not too late to make a Christmas planner

December 3, 2010 By Janice Daquila-Pardo Leave a Comment

I love Christmas. In fact, my family calls me “the Christmas girl” and “Cindy Lou Who” during this time of year. One of the myriad things I love about the Christmas season is that it gives me an excuse to make gifts for the ones I love.

A few years ago I decided I wanted to make a Christmas planner for my mom as a little Thanksgiving gift. So I searched online for examples and found tons, of course. But then I found one particular resource that’s right on the mark: christmasplanner.com gathers tutorials from all over the web for making Christmas planners of all varieties! Nice.

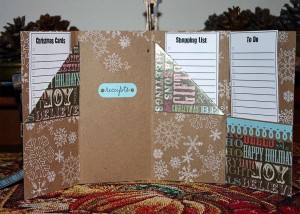
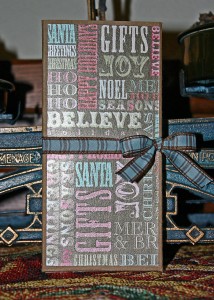
I chose one of the examples, followed the tutorial, and this is what I came up with for Mom:

Christmas planner, inside view

My Christmas planner, inside view

Christmas planner outside view

My Christmas planner, front view

If you’ve been wanting to make a planner but think it will take too much of your precious Christmas crafting time, just take a few minutes to look at this site before you decide. The examples/tutorials range from very simple to really involved. So, you can choose how much time to devote to your project. I chose to follow a tutorial that was on the simple side, and I really enjoyed making it. Plus it gave me a nice opportunity to use some of my Christmasy supplies and then give away the final result! Happy crafting!

Filed Under: Tips Tagged With: Christmas, tutorial

« Previous Page

Primary Sidebar

Thanks for visiting!

Hi, I'm Janice.

Follow me

Follow on Bloglovin

My sketches on Pinterest

Design team

I am a proud Stuck?! Sketches designer!

Past design teams

Scrap & Music sketch designer

Creative Scrappers sketch designer

Sketches With a Twist sketch designer

Sketchabilities design team

Twisted Sketches design team

Secondary Sidebar

Topic categories

  • 12×12 layouts using 6×6 paper
  • Cards
  • Freebies/giveaways
  • Layouts based on sketches
  • Layouts using 3×4 journaling cards
  • My scrapbook layouts
  • Reviews
  • Scrapbook products
  • Sketches
    • My sketches
  • That redo that you do
  • Tips
  • Tutorials
  • Uncategorized

Archives

Tags

1 photo 2 photos 3 photos 4 photos American Crafts banner Basic Grey Bella Blvd Blogtoberfest border punches cards Christmas Copic coloring Crate Paper Creative Scrappers Echo Park emotional journaling Fancy Pants Halloween hand stitching Jillibean Soup Little Yellow Bicycle Making Memories Martha Stewart Crafts My Mind's Eye October Afternoon one-page layouts Pebbles Pink Paislee rosette Scrap & Music sketches scrapbook philosophy Silhouette Simple Stories Sketches with a Twist Sketch Support Spellbinders stamping Stuck?! Sketches Tim Holtz Distress Ink tutorial Twisted Sketches two-page layouts vintage photos We R Memory Keepers

Copyright © 2010-2018 The Constant Scrapper