• Skip to primary navigation
  • Skip to main content
  • Skip to primary sidebar
  • Skip to secondary sidebar
  • Home
  • About me

The Constant Scrapper

If I'm not scrapbooking I'm thinking about scrapbooking!

December 13, 2014 By Janice Daquila-Pardo Leave a Comment

Wine bottle tag tutorial

Share on pinterest
Pinterest
Share on facebook
Facebook
If you like this, please share!
TisTheSeasonWineTags1_Daquila-Pardo

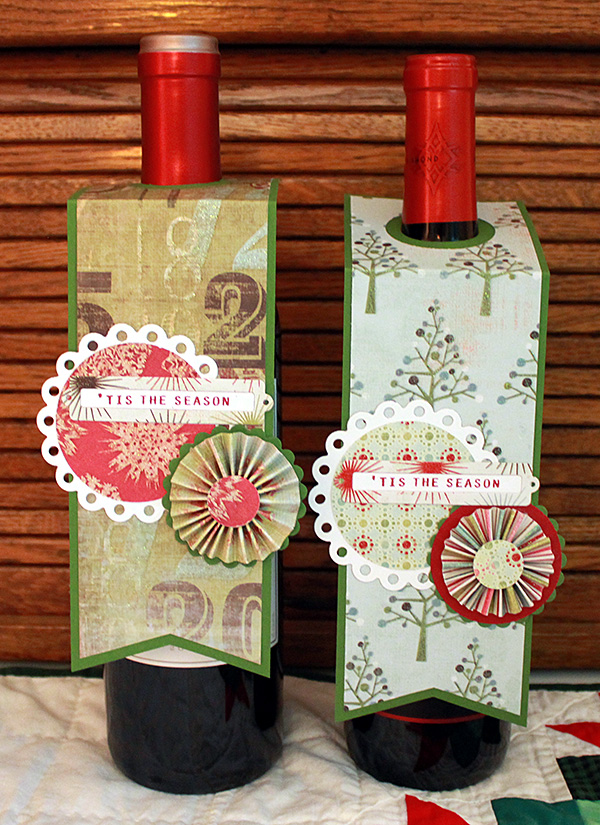
We have some Christmas parties to attend this weekend, so I thought I would try my hand at making some wine tags to adorn the bottles we took along. Here’s a tutorial based on what I learned while creating mine.

Tutorial

  1. Cut base paper (I used cardstock, but it would look quite nice with patterned paper as well) to 3 x 10 inches.
  2. Score base paper at 3 inches.
  3. Cut patterned paper to 2.75 x 9.75 inches.
  4. Don’t score the patterned paper yet; you want to wait until it’s lined up properly on the base paper so you know exactly where it needs to be folded. But I do recommend scoring a second time so that your project folds crisply. I’ll tell you when.
  5. Notch the bottom of the patterned paper into a banner shape.
  6. Lay the patterned paper on the base paper and cut the matching notch into the base paper.
  7. Flip the base paper over and find the center of the 3-inch section by lightly drawing an X from corner to corner. This will ensure that you punch your bottle neck opening in the right spot.
  8. At this point, because I use adhesive that isn’t hard to pull up, I adhered the two papers together so that I could punch them at the same time. Then I used a 1.25-inch circle punch to create the bottle neck opening.
  9. Carefully pull up the patterned paper from the base paper and line up a 1.5-inch circle punch around the original hole to create the double ring effect. Glue the two papers back together.
  10. Now put the project back on your scoring board and score again at 3 inches.
  11. Have fun embellishing your wine tags!
TisTheSeasonWineTags2_Daquila-Pardo

Closeup shot of the left tag

TisTheSeasonWineTags3_Daquila-Pardo

Closeup shot of the right tag

Product/technique notes

I created both of these tags using past years’ My Mind’s Eye Christmas collections—”Festive” on the left tag and “Be Merry” on the right one. I loved how they turned out! And I’m entering them in the MME December challenge to make small gifts/stocking stuffers.

Filed Under: Tutorials Tagged With: Christmas, My Mind's Eye, rosette

Reader Interactions

Leave a Reply Cancel reply

Your email address will not be published. Required fields are marked *

Primary Sidebar

Thanks for visiting!

Hi, I'm Janice.

Follow me

Follow on Bloglovin

My sketches on Pinterest

Design team

I am a proud Stuck?! Sketches designer!

Past design teams

Scrap & Music sketch designer

Creative Scrappers sketch designer

Sketches With a Twist sketch designer

Sketchabilities design team

Twisted Sketches design team

Secondary Sidebar

Topic categories

  • 12×12 layouts using 6×6 paper
  • Cards
  • Freebies/giveaways
  • Layouts based on sketches
  • Layouts using 3×4 journaling cards
  • My scrapbook layouts
  • Reviews
  • Scrapbook products
  • Sketches
    • My sketches
  • That redo that you do
  • Tips
  • Tutorials
  • Uncategorized

Archives

Tags

1 photo 2 photos 3 photos 4 photos American Crafts banner Basic Grey Bella Blvd Blogtoberfest border punches cards Christmas Copic coloring Crate Paper Creative Scrappers Echo Park emotional journaling Fancy Pants Halloween hand stitching Jillibean Soup Little Yellow Bicycle Making Memories Martha Stewart Crafts My Mind's Eye October Afternoon one-page layouts Pebbles Pink Paislee rosette Scrap & Music sketches scrapbook philosophy Silhouette Simple Stories Sketches with a Twist Sketch Support Spellbinders stamping Stuck?! Sketches Tim Holtz Distress Ink tutorial Twisted Sketches two-page layouts vintage photos We R Memory Keepers

Copyright © 2010-2018 The Constant Scrapper