• Skip to primary navigation
  • Skip to main content
  • Skip to primary sidebar
  • Skip to secondary sidebar
  • Home
  • About me

The Constant Scrapper

If I'm not scrapbooking I'm thinking about scrapbooking!

January 26, 2011 By Janice Daquila-Pardo 5 Comments

White water: one-photo layout

Share on pinterest
Pinterest
Share on facebook
Facebook
If you like this, please share!

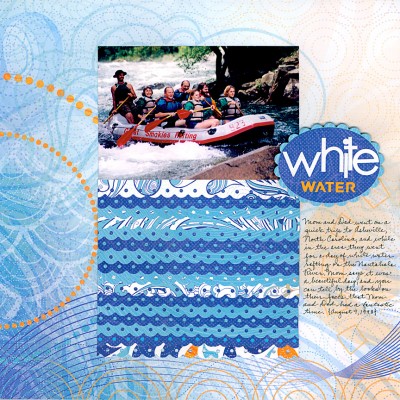
There’s a great sketch (#85) over at the Twisted Sketches site, and the twist is “white.” Here is my interpretation. I used layered strips of patterned paper cut with border punches to create an abstract wave effect (which takes the place of the circle in the sketch).

I just love the feeling in this photo of my parents white water rafting. They’re the two at the back of the raft, right in front of the guide, with huge smiles lighting up their faces. I could just stare at their smiles for ages. I love having a photo of them looking like care-free kids.

WhiteWater_JDaquila-Pardo

Mom and Dad on a white water rafting trip in 1998

Filed Under: 12x12 layouts using 6x6 paper, My scrapbook layouts Tagged With: 1 photo, one-page layouts

Reader Interactions

Comments

  1. Phil Daquila says

    January 26, 2011 at 1:50 pm

    Oh my! Really truly LOVE this page, Jani. This pic is still up on Mom’s refrigerator and now it has a proper presentation. So much better than even a frame. (I know I will not get an argument from you on that point.) Thanks for creating this one.

    Reply
    • Janice Daquila-Pardo says

      January 28, 2011 at 9:10 am

      I’m so glad you like it, Philly! I really had a great time creating this one; it made me happy the whole time.

      Reply
  2. Christina says

    January 26, 2011 at 5:15 pm

    Cute page! I love the photo and the papers you chose!

    Reply
  3. lalo says

    January 27, 2011 at 5:07 pm

    Great layout!!!
    I like how you made that “abstract wave” It looks really good and the background paper is super cool 🙂
    This is a really awesome LO

    Reply
    • Janice Daquila-Pardo says

      January 28, 2011 at 9:43 am

      Thanks! 🙂 It took a while to punch all those layers, but then it was quite easy to assemble. If you ever want to try it on one of your projects, I recommend building the layers from the bottom to the top on a separate piece of cardstock and then adhering it to your layout.

      Reply

Leave a Reply Cancel reply

Your email address will not be published. Required fields are marked *

Primary Sidebar

Thanks for visiting!

Hi, I'm Janice.

Follow me

Follow on Bloglovin

My sketches on Pinterest

Design team

I am a proud Stuck?! Sketches designer!

Past design teams

Scrap & Music sketch designer

Creative Scrappers sketch designer

Sketches With a Twist sketch designer

Sketchabilities design team

Twisted Sketches design team

Secondary Sidebar

Topic categories

  • 12×12 layouts using 6×6 paper
  • Cards
  • Freebies/giveaways
  • Layouts based on sketches
  • Layouts using 3×4 journaling cards
  • My scrapbook layouts
  • Reviews
  • Scrapbook products
  • Sketches
    • My sketches
  • That redo that you do
  • Tips
  • Tutorials
  • Uncategorized

Archives

Tags

1 photo 2 photos 3 photos 4 photos American Crafts banner Basic Grey Bella Blvd Blogtoberfest border punches cards Christmas Copic coloring Crate Paper Creative Scrappers Echo Park emotional journaling Fancy Pants Halloween hand stitching Jillibean Soup Little Yellow Bicycle Making Memories Martha Stewart Crafts My Mind's Eye October Afternoon one-page layouts Pebbles Pink Paislee rosette Scrap & Music sketches scrapbook philosophy Silhouette Simple Stories Sketches with a Twist Sketch Support Spellbinders stamping Stuck?! Sketches Tim Holtz Distress Ink tutorial Twisted Sketches two-page layouts vintage photos We R Memory Keepers

Copyright © 2010-2018 The Constant Scrapper